


11-EN
Receiving Traffic Information While
Playing CD or Radio
1
Press and hold BAND/TA for at least 2 seconds so
that the “TA” indicator lights up.
2
Press or to select a traffic information
station if necessary.
When a traffic information broadcast starts, the unit
automatically mutes the CD player or the regular FM
broadcast.
When the traffic information broadcast finishes, the unit
automatically returns to the original source play before the
traffic information broadcast began.
When traffic information stations cannot be received:
In the CD mode:
When the TP signal can no longer be received, the traffic
information station of another frequency will be selected
automatically.
• The receiver is equipped with the EON (Enhanced Other Networks)
function in order to keep track of additional alternate frequencies to
the AF list. The “EON” indicator lights up while an RDS EON
station is being received. If the station being received does not
broadcast the traffic information, the receiver automatically tunes in
the related station that broadcasts the traffic information when it
occurs.
3
Press and hold BAND/TA for at least 2 seconds to
deactivate the Traffic Information mode.
The “TA” indicator goes out.
Displaying Radio Text
Text messages from a radio station can be displayed.
Press VIEW while receiving FM in the radio mode to
select the Radio Text display.
The display will change every time the button is pressed.
If there is PS (Programme Service Name):
PS (Programme Service Name)* CLOCK RADIO TEXT
PS (Programme Service Name)
* If VIEW is pressed and held for at least 2 seconds while displaying
PS in the radio mode, frequency will be displayed for 5 seconds.
If there is no PS (Programme Service Name):
FREQUENCY CLOCK RADIO TEXT FREQUENCY
The display shows “WAITING” for a few seconds, then starts
scrolling the text message.
• If there is no receivable text message or the unit cannot receive a text
message properly, the display shows “NO TEXT”.
• “ ” lights up when switching to the TIME display mode.
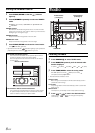
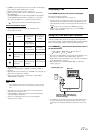
Playback
1
Insert a disc with the label side facing up.
The disc will be pulled into the unit automatically, and the
“
” indicator lights up.
When a disc is already inserted, press SOURCE/ to
switch to the DISC mode.
The mode will change every time the button is pressed.
TUNER DISC USB AUDIO iPod*
1
/AUX+*
2
BT AUDIO*
3
AUX*
4
TUNER
*
1
Only when the iPhone/iPod is connected and AUX+ SETUP is set to
OFF, refer to
“Setting the AUX+ SETUP Mode” (page 20).
*
2
Displayed only when AUX+ SETUP is set to ON, refer to “Setting the
AUX+ SETUP Mode” (page 20).
*
3
Only when BT IN is set to BT ADAPTER. Refer to “Bluetooth
Setting” (page 18).
*
4
Refer to “Using the Front AUX Input Terminal” (page 17).
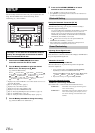
2
While playing back MP3/WMA/AAC, press 1 /AF
or 2 to select the desired folder.
Pressing and holding 1 /AF or 2 will change folders
continuously.
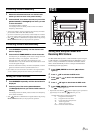
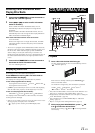
CD/MP3/WMA/AAC
VIEW
Rotary encoder
1/AF
/ESC
/ENT
/CD
SOURCE/
/REPEAT 4
/SHUFFLE 5
2
/