


6
• The LCD screen is manufactured to precise specifications. Although over 99.99% of the pixels function normally,
0.01% of the pixels are either missing or constantly lit (red, blue or green). This is normal and not a cause for
concern.
• The liquid crystal protection panel is a specially manufactured component. Wiping it with a hard cloth, or rubbing
it vigorously will scratch the surface.
• If a still image is displayed for an extended period of time, it may generate a temporary afterimage (phosphor
burn-in). (However, such images can be removed by displaying normal video for a while.)
• The response speed and brightness of liquid crystal vary with ambient temperatures.
• Let authorized service person handle installation.
Be sure to consult with the service person about the installation. Make sure that the wall is strong enough to
endure the weight of this unit including the mount fittings. If not strong enough, it may fall off resulting in injury.
• Do not install the unit in a place exposed to direct sunlight, as it may damage the cabinet and the LCD screen.
• Be sure to attach a protection panel (optional accessory) when the unit is used outdoors.
• Do not install the unit in locations where enough space cannot be provided around it as heat may build up inside
preventing normal operation. Be sure to provide enough space around the unit.
• Exposing the LCD screen to intense light sources will impair its characteristics and lower image quality.
• In an environment exposed to drastic temperature fluctuations, condensation may build up on and inside the
LCD screen. This may lower the quality of the screen and may damage it.
• Some video images may appear blurred on the screen.
• Leaving the unit in a location exposed to high temperature and humidity for an extended period of time may
damage the LCD screen and cause blurring.
Contents
Read this first ! . . . . . . . . . . . . . . . . . . . . . . . . . . . . 2
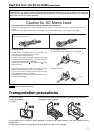
Transportation precautions . . . . . . . . . . . . . . . . . . . 5
Precautions for Use . . . . . . . . . . . . . . . . . . . . . . . . 6
Standard accessories . . . . . . . . . . . . . . . . . . . . . . . 6
Optional units . . . . . . . . . . . . . . . . . . . . . . . . . . . . . . 6
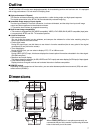
Outline . . . . . . . . . . . . . . . . . . . . . . . . . . . . . . . . . . . . 7
Dimensions . . . . . . . . . . . . . . . . . . . . . . . . . . . . . . . . 7
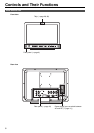
Controls and Their Functions . . . . . . . . . . . . . . . . . 8
Video monitor unit ................................................... 8
Front panel ............................................................. 9
Rear panel............................................................ 10
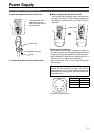
Power Supply. . . . . . . . . . . . . . . . . . . . . . . . . . . . . . 11
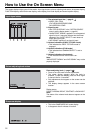
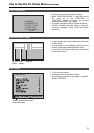
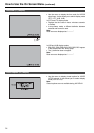
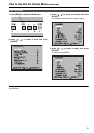
How to Use the On Screen Menu . . . . . . . . . . . . . . 12
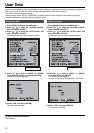
User Data . . . . . . . . . . . . . . . . . . . . . . . . . . . . . . . . 16
Main Menu . . . . . . . . . . . . . . . . . . . . . . . . . . . . . . . 17
Menu configuration............................................... 17
MARKER.............................................................. 18
Marker types......................................................... 19
VIDEO CONFIG ................................................... 20
SYSTEM CONFIG................................................ 22
FUNCTION........................................................... 23
GPI ....................................................................... 29
INPUT SELECT.................................................... 30
AUDIO ................................................................... 32
DISPLAY SETUP .................................................. 33
CONTROL............................................................ 34
HOURMETER ...................................................... 34
REMOTE Specifications . . . . . . . . . . . . . . . . . . . . 36
How to Attach the Rack Mount. . . . . . . . . . . . . . . . 40
Maintenance Inspections . . . . . . . . . . . . . . . . . . . . 40
Error and Warning Displays . . . . . . . . . . . . . . . . . . 41
Maintenance. . . . . . . . . . . . . . . . . . . . . . . . . . . . . . 41
Specifications . . . . . . . . . . . . . . . . . . . . . . . . . . . . 42
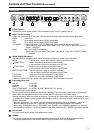
Standard accessories
<For BT-LH1760P>
Operationg instructions × 1
Warranty (Card) × 1
Power cord × 1
Power cord hook × 1
Screw × 1
<For BT-LH1760E>
Operationg instructions × 1
AC mains lead × 2
AC mains lead hook × 1
Screw × 1
Optional units
Rack Mount Adaptor BT-MA1710G (Installation instructions J page 40)
Wall Mount Adaptor BT-WMA17G (Leave installation of the wall mount adaptor to authorized personnel.)
Protection Panel BT-PRP17G (Refer to the installation instructions in the operating instructions supplied with the
protection panel.)
Precautions for Use