


User Manual BDL4230ET
RETURN TO THE CONTENTS
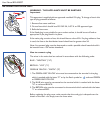
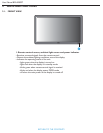
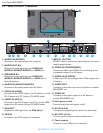
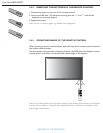
2.2. REAR VIEW
1. ENTER/VIDEO SOURCE button
• Use this button to select the input source.
• When the On Screen Display menu is active, this is also used as the SET button.
2. MENU button
• Use this button to engage the On Screen Display menu.
• When the On Screen Display menu is active, use this button to return to the previous menu.
3.
/
button
• When the On Screen Display menu is active, use these as the UP/DOWN menu buttons.
• Press and hold the
and
buttons simultaneously for 3 seconds to lock or unlock all buttons.
4.
/
button
• When the On Screen Display menu is active, use these as the PLUS/MINUS menu buttons.
5. POWER button
Use this button to turn the display on or into standby mode.
6. Power indicator
Indicates the operating status of the unit:
- lights green when the display is turned on
- lights red when the display is in standby mode
- blinks red when the display enters DPMS mode
- off when the main power of the display is turned off
7. Smart Insert installation holes
Location for the Smart Insert (for integration of a small form factor PC) and M4 screws. (Maximum
load: 2kg)
8. Cable retainer installation holes
Install the cable retainer using these holes.
9. Carrying handle
Use these handles when lifting or moving your display.
1 3 42 5
9
6
8
7
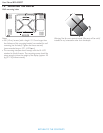
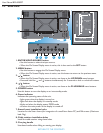
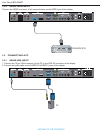
100 mm
100 mm 100 mm
280 mm
290.4 mm
200 mm
210.4 mm
35 mm
Dent depth:
6mm