


User Manual BDL4230ET
RETURN TO THE CONTENTS
11. Press the EXIT button and the menu will close and the schedule settings will take effect.
To set up more schedule items, repeat the steps above except that a different schedule item should be
selected (schedule item #2 ( 2) through #7 ( 7)) in step 2.
Notes:
• Seven scheduling options are available so that you can choose between different video input modes for different
schedules during the week. For example, VGA input on a Monday, HDMI on Tuesday to Friday, S-VIDEO for
weekends.
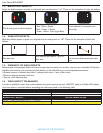
• If you do not want to use a power on time, select "--" for the power on hour slot, and "00" for the minute slot. The
display will only turn off at the time you set.
• If you do not want to use a power off time, select "--" for the power off hour slot, and "00" for the minute slot. The
display will only turn on at the time you set.
• If no input source is selected, the default input source (VIDEO) will be used.
• If EVERY DAY is selected, the display will turn on everyday regardless of other day settings (e.g MON, TUE, WED...,
etc.).
• Should schedule periods overlap, the power on time has priority over power off time. For example, if schedule item
#1 sets the display to power on at 10:00 AM and off at 5:00 PM, and schedule item #2 sets the display to power
on at 4:00 PM and off at 9:00 PM on the same day, then the display will power on at 10:00 AM and off at 9:00
PM.
• If there are multiple schedule items programmed for the same time period, then the highest numbered schedule item
has priority. For example, if schedule items #1 and #2 both set the display to power on at 7:00 AM and off at 5:00
PM, then only schedule item # 1 will take effect.
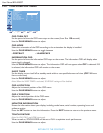
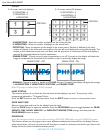
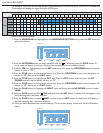
MONITOR ID
Set the ID number for controlling the unit via the RS232C connection. Each display must have a unique ID
number when multiple BDL4230ET units are connected.
See table under "TILING" for more information. Use the PLUS/MINUS button to select an ID.
DDC/CI
Choose to turn ON or OFF the DDC/CI communication function. Select ON for normal use.
Use the PLUS/MINUS button to make selection.
SMART POWER
Set the display to reduce the power consumption automatically. Setting to HIGH will bring the most power
savings.
Use the PLUS/MINUS button to toggle between
AUTO SIGNAL DETECTION
Select to let the unit detect and display available signal source automatically.
• ON - Set the unit to display the image automatically once a signal is connected.
• OFF - Once a signal is connected, it can only be selected manually.
Use the PLUS/MINUS button to make selection.
ADVANCED OPTION RESET
Reset all settings in the ADVANCED OPTION menu.
Press the SET/PLUS button to open the submenu, and then press the UP/DOWN button to make
selection. Select YES and press the SET button to restore settings to factory preset values. Press the EXIT
button to cancel and return to the previous menu.
• OFF • MEDIUM
• HIGH