


DIS Digital Conference System User Manual
Installation Manual SW 6000 ver 6.2.docx
29
A User Type is also associated with each
seat to determine the settings that must
apply as default when no one is logged
in.
8.
Select the
“Setup/Equipment/Conference Units”
and assign a user type to each of the
seats to be used as a default when no one
is logged in.
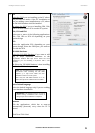
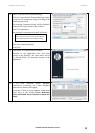
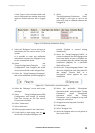
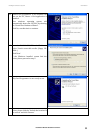
Figure 6.1-B Generate Connection String
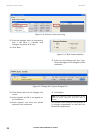
9. Select the “Delegates” screen and type in
information for the various users of the
system.
It is possible to enter any additional
information required for delegates in up
to four customisable fields.
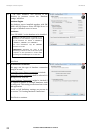
10. Select the
“Setup/Configuration/Delegate List
Configuration” and configure the width
of the various fields on the delegate lists.
11. Select the “Setup/Language/Languages”
and create additional system languages if
needed (English is created during
installation).
12. Select the “Setup/Language/Labels” to
create translations for the languages that
have been added. If some or all labels are
not translated then the default language
translation (English) for a particular
label will be used.
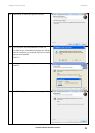
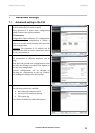
13. Select the “Setup/Language/Labels” and
chose the English tab and select label 40
and change “Plenary Hall” to a
description, which applied for your
installation
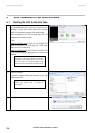
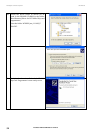
Figure 6.1-C Chan label for room description
14. Select the “Message” screen and create
messages.
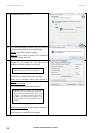
15. Select “Setup/Configurations/CDA
Configuration and change (if needed)
Font Size, Colours etc. for the various
CDA screens available.
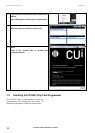
16. Select “Conference”
17. Add a conference
18. Fill in a proper name for the conference.
19. If chip cards or login using code are not
in use select “Prepared Delegate List”.
20. Select the preferable “Microphone
Operation Mode” and preferable “Voting
Parameters” (both “Microphone
Operation Mode” and “Voting
Parameters” can be changed at any time
during the conference”
21. Change Start and Stop date if needed.
22. Click update
23. Select “Delegate List
24. Select the delegate who is to be placed in
Seat 1 and click >>