


10
2 Enter the IP address that was
assigned to the display control
function into the address field, in the
format “http://xxx.xxx.xxx.xxx”.
Then press the Enter key on the
keyboard.
When a user name and password
have been set, the “Network
Password” screen appears. Enter the
user name and password that were
set, and then proceed to the next step.
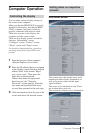
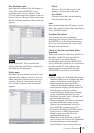
3 Click the “Setup” tab.
The “Setup” screen appears. This
screen lets you set up the Network
Password. The factory default
settings are as follows:
Name: root
Password: fw50ad
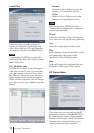
4 Click the “Network” button.
5 Under “Internet Protocol (TCP/IP)”,
click “Specify an IP address”. Then
enter the IP address for the still
image/video playback function in the
input fields.
6 Click “Apply”.
Automatically obtaining an IP
address
If you set up the display as described
below, an IP address can be assigned
automatically by a DHCP server on the
network.
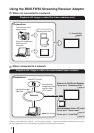
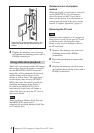
1 Connect the BKM-FW50 installed in
the display to the network, using
suitable LAN cable.
2 Turn power to the display on and
wait for about 30 seconds.
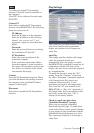
3 Press the MENU button on the
display to bring up the main menu.
Preparations for Using the Network Functions
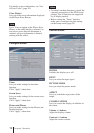
4 Use the M/m buttons to select
“INITIAL SETUP/INFORMATION”
and press the ENTER button. The
“INITIAL SETUP/INFORMATION”
menu appears.
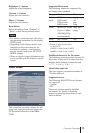
5 Use the M/m buttons to select “IP
Address Setup” and press the ENTER
button.
6 Use the M/m buttons to select
“DHCP” and press the ENTER
button.
7 Use the M/m buttons to select
“Execute” and press the ENTER
button.
Note
The IP address may not be obtained
correctly, depending on the router being
used. Confirm the specifications and
operations of the router before use.
Checking the automatically
assigned IP address
When an IP address has been automatically
assigned, you can call up the display
control screen of the BKM-FW50 as
follows and check which IP address has
been assigned. The IP address changes each
time power to the display is turned on.
Therefore you must check the IP address as
described here every time after turning
power to the display off and on again.
1 Press the MENU button on the
display to bring up the main menu.
2 Use the M/m buttons to select
“INITIAL SETUP/INFORMATION”
and press the ENTER button. The
“INITIAL SETUP/INFORMATION”
menu appears.
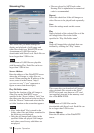
3 Use the M/m buttons to select
“INFORMATION” and press the
ENTER button.
4 Check the IP address that is displayed
in the “IP address” field.