


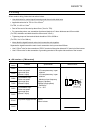

E6580772
7
2. Connection to the inverter
Connect the F10M option unit to the inverter according to the procedures below.
2.1 Connection to the inverter
(1) Confirm that the all power to the inverter are turned off beforehand.
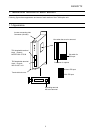
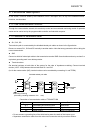
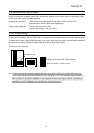
(2) Fixing the F10M option unit alone by using screws
<
<<
<When the unit is installed alone>
>>
>
Tighten M4x25 screws with M4 nuts to an attachment of optional add-on cassette (separately procured)
to fix the unit as shown in the figure below.
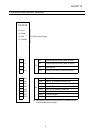
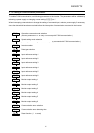
<
<<
<When the unit is installed with another option>
>>
>
Read instructions of ‘connection with options’ on the following page for installation. Same procedures
apply when three options are installed together.
(When plural options are installed, order of installation from the inverter side is not specified.)
(Note) Determine the initial setting of the bit switch for internal signal before connecting options.
Mount a board for option connection, then use M4x50 screws and M4 nuts to fix the options as shown
below.
(When three units of option are installed, use M4x75 screws.)
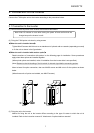
(3) Fixing the unit to the inverter
Method for fixing the unit to the inverter differs according to the type of inverter to which the unit is
installed. Refer to the instruction manual of “Attachment of optional add-on cassette”.
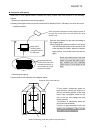
Note: Wait 10 minutes or more after turning the power off and confirm that the
charge lamp on the inverter is unlit.