


7-EN
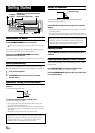
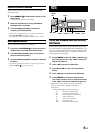
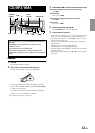
Detaching and Attaching the Front Panel
Detaching
1
Turn off the unit power.
2
Press (Release) at the upper left side until the
front panel pops out.
3
Grasp the left side of the front panel and pull it out.
• The front panel may become hot in normal usage (especially the
connector terminals on the back of the front panel.) This is not a
malfunction.
• To protect the front panel, place it in the supplied carrying case.
Attaching
1
Insert the right side of the front panel into the main
unit. Align the groove on the front panel with the
projections on the main unit.
2
Push the left side of the front panel until it locks
firmly into the main unit.
2
11
• Before attaching the front panel, make sure that there is no dirt or
dust on the connector terminals and no foreign object between the
front panel and the main unit.
• Attach the front panel carefully, holding the sides of the front panel
to avoid pushing buttons by mistake.
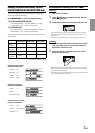
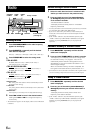
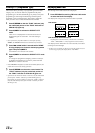
Changing the Audio Level Display Pattern
(CDA-9815RB/CDA-9813R/CDA-9812RX only)
You can select the Audio Level display from three display patterns.
You can also deactivate the display.
Press DISP/B.OUT to switch the display pattern.
For CDA-9815RB/CDA-9813R:
AUDIO ADJUSTMENT → EQ ADJUSTMENT → X-OVER
ADJUSTMENT → OFF → AUDIO ADJUSTMENT
For CDA-9812RX:
AUDIO ADJUSTMENT → BASS ADJUSTMENT → TREBLE
ADJUSTMENT → OFF → AUDIO ADJUSTMENT
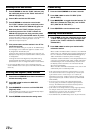
The indicators show the value that is set in each mode as
shown below.
AUDIO
EQ/BASS/TREBLE
X-OVER
ADJUSTMENT ADJUSTMENT ADJUSTMENT
Level
Indicator
Width
indicator
Frequency
Indicator
Sub-W
Indicator
∗
Only when SUB-W is set to ON
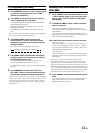
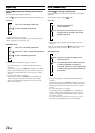
AUDIO Adjustment Display
Example for CDA-9813R
VOLUME : 18
BALANCE : L6
FADER : F6
SUB-W : 9dB
EQ Adjustment Display
Example for CDA-9813R
LEVEL : +2
WIDTH : 2
FREQUENCY
: 200Hz
VOLUME
BALANCE
FADER
SUB-W
∗
LEVEL
WIDTH
FREQUENCY
-
LEVEL
SLOPE
FREQUENCY
-
X-OVER Adjustment Display
Example for CDA-9813R
LEVEL : -7dB
SLOPE : 2 (-12dB/oct)
FREQUENCY
: 2k