


-8-
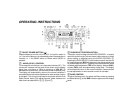
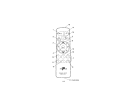
cr DISC SELECT UP/DOWN (CD+/CD-)
During CD changer operation, these buttons are used to select the
desired disc for play. To advance to a higher number disc, press the
CD+ button, and to return to a lower number disc, press the CD- button.
The number of the disc in play will be shown on the display panel.
cs DISC EJECT ( )
During CD player operation, disc play is stopped and the disc is ejected
when the front panel is folded down and this button on the rear of the
panel is pressed. Radio or CD changer operation will automatically
resume depending on which mode was in operation prior to disc play.
If the disc is not removed from the unit within approximately 15 seconds
of being ejected, it will automatically be re-loaded into the unit to prevent
it from being accidentally damaged ( IN will appear on the display
panel to indicate that a disc is loaded in the player). Play of the disc can
be resumed by using the Mode Selector bt to choose CD player function.
ct TIME/FREQUENCY SELECTOR (T/F)
During radio operation, press this button to call the time display on the
incorporated quartz clock. The display will return to the radio frequency
indication after 5 seconds.
During integral CD player operation, the first press of the button will call
the track elapsed time on the display panel. A second press will call the
time display. During CD changer operation the first press of the button
will call the time display. A second press will call the disc slot number
and track number in play. In either case, the display will return to the
disc indication after 5 seconds.
cu EQUALIZER BUTTON (EQ)
The EQ button applies preset sound effects to the unit’s audio
output signal. The EQ button, when pressed, will activate one of
three operating modes (ROCK, CLAS, or POP). When the
Equalizer function is active the bass and treble levels cannot be
changed. When the Equalizer function is not active, the unit returns
to the user set bass and treble levels.
dl THEFT-DETERRENT LED
Located on the chassis behind the front panel, a Light Emitting
Diode (LED) will flash when the panel is removed. The flashing
light serves as a visual warning to the would-be thief that the unit
has been disabled by removal of the front panel.
dm RESET BUTTON
A RESET button is also accessible behind the front panel and can be
used to activate the reset circuitry. However, this feature should only be
activated under the following circumstances as it will erase the time and
pre-set memories:
1. Upon initial installation after all wiring is completed.
2. If there is a malfunction of any of the switches, on the unit,
pressing the RESET button may clear the system and return
to normal operation.
dn REMOTE SENSOR
The sensor to detect the infrared signal from the wireless remote
control is located behind this lens. For optimum operation of the
remote control, always aim the control at this sensor.
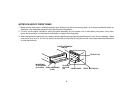
do FRONT PANEL RELEASE BUTTON (OPEN)
This button is used to release the mechanism that holds the front
panel to the chassis. To detach the front panel, press the button
so that the panel drops to the lowered position. Grasp the panel at
the middle and slide it off of the front mounting plate. After removing
the panel, push the metal plate back up to the vertical position.