


2-4
A Guide to TracVision L2
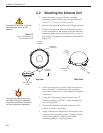
2.2 Mounting the Antenna Unit
1. Make sure that you have chosen a suitable
mounting location based upon the guidelines in
Section 2.1, “Choosing the Best Location.”
2. Remove the antenna unit from its shipping carton.
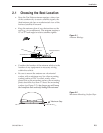
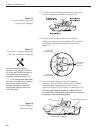
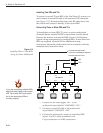
3. Position the antenna unit in the desired location
on the centerline of the vehicle with the antenna’s
mounting plate arrows facing the front or rear of
the vehicle. The proper orientation is illustrated in
Figure 2-3.
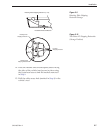
4. While the antenna is in place, mark a location on
the roof for the
3
⁄4" cable access hole to permit
convenient cable access to the antenna’s baseplate
connectors.
5. Using the 4 mounting plates and each set of 5
holes as templates, drill 20
3
⁄16" holes through the
roof of the vehicle.
6. Set aside the antenna unit and clean the roof’s
surface to remove any debris.
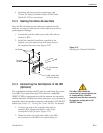
7. Apply construction adhesive to the bottom of the
antenna’s four mounting plates. If using a liquid
construction adhesive, apply beads to the
mounting plates in a zig-zag pattern.
Vehicle
Centerline
Vehicle
Centerline
Front/Rear
of Vehicle
Front/Rear
of Vehicle
Top View Side View
Mounting Plate
(1 of 4)
Baseplate
Connectors
Mounting Plate
Arrows
Always lift the antenna unit by the
gray baseplate, never by the
radome!
The mounting plate arrows may
face either forward or backward
along the centerline of the vehicle
for more convenient installation.
Figure 2-3
Proper Orientation of
the Antenna Unit