


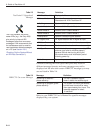


4. Terminate all unused output connectors with
75 ohm DC blocks (Channel Master #7184, Radio
Shack #15-1259 or equivalent).
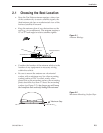
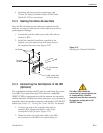
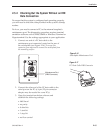
2.3.3 Sealing the Cable Access Hole
Once the RF and data/power cables are connected to the
antenna, you need to seal and cover the cable access hole to
protect against leakage.
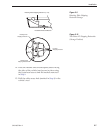
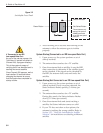
1. Completely seal the cable access hole with silicone
sealant or RTV.
2. Install the clamshell ventilator, supplied in the
kitpack, over the cable access hole using three of
the supplied #6 screws (see Figure 2-15).
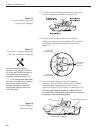
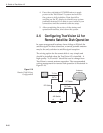
2.3.4 Connecting the Switchplate to the IRD
(Optional)
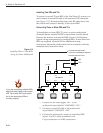
The switchplate includes an RJ11 jack for connecting the system
to an IRD’s low-speed data port. This allows a compatible
DIRECTV IRD to communicate with the antenna for automatic
satellite selection. Without this data connection, you will need to
manually select the satellite using the switchplate’s SAT SELECT
button (see Section 3.2, “Tracking the Correct Satellite” for details).
1. Connect one end of the supplied data cable (a
standard RJ11 telephone handset cord) to the
switchplate’s RJ11 jack (see Figure 2-13).
2. Route the other end of the data cable to the IRD
and connect it to the IRD’s low-speed data port.
2-11
Installation
54-0195 Rev. A
EchoStar IRDs cannot be
connected to the switchplate due
to incompatibility. Satellite
selection must be done manually
through the switchplate’s SAT
SELECT button.
Clamshell
Ventilator
#6 Screws
Cable Access Hole
(in Roof of Vehicle)
RF & Data/Power
Cables
To Tr acVision
Antenna
Figure 2-15
Installing the Clamshell Ventilator