


2-5
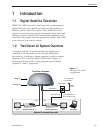
Installation
54-0195 Rev. A
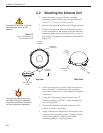
8. Reposition the antenna, lining up the mounting
plate holes with the holes in the roof. Attach the
mounting plates to the roof using
3
⁄16"-diameter
rivets (or appropriate fasteners). Seal all rivet
heads and edges with silicone.
9. Remove and save the 8 pan head screws and flat
washers that secure the radome to the baseplate.
Carefully lift the radome straight up until clear of
the antenna assembly and set aside.
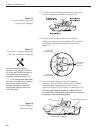
10. When the antenna unit is installed with the
baseplate connectors facing the rear of the vehicle,
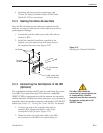
the drain holes are located as shown in Figure 2-4.
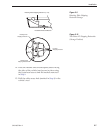
Factory-drilled
Drain Hole Positions
Front of
Vehicle
Recommended
3/16" Drain Hole
Positions
Drain Hole Angle
(relative to baseplate)
Front of
Vehicle
Angle of Hole, relative to front
Angle of Hole, relative to front
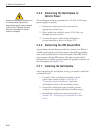
Figure 2-5
Baseplate Connectors Facing Front
of Vehicle – Recommended
Drain Hole Locations
You MUST drill out the drain holes
as indicated to ensure that any
moisture that enters the baseplate
is able to drain. Ensure that factory-
drilled holes are completely sealed.
10a.(Alternate Drain Hole Locations) If the antenna unit
is installed with the baseplate connectors facing
the front of the vehicle, drill out
3
⁄16"-drain holes in
the rear-facing side of the baseplate as illustrated
in Figure 2-5. The existing factory-drilled drain
holes shown in Figure 2-4 must then be plugged
with silicone rubber sealant.
Figure 2-4
Baseplate Connectors Facing Rear
of Vehicle – Factory-drilled
Drain Hole Locations
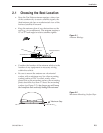
If the roof’s mounting surface is not
perfectly flat as KVH recommends,
make sure the baseplate does not
warp when you attach the
antenna’s mounting plates. Refer to
Section 2.1, “Choosing the Best
Location,” for further details.