


English-34
OSD screen functions
PICTURE
BRIGHTNESS
You can adjust the brightness.
Press the PLUS (+) button to increase the brightness. Press
the MINUS (-) button to decrease the brightness.
CONTRAST
You can adjust the contrast.
Press the PLUS (+) button to brighten dark areas in the image.
Press the MINUS (-) button to darken bright areas in the image.
SHARPNESS
You can adjust the sharpness.
Press the PLUS (+) button to make the image look sharper.
Press the MINUS (-) button to make the image look softer.
NOTE : If you increase the sharpness setting value too
much, lines may appear double. In such a case,
decrease the sharpness setting value.
BLACK LEVEL
You can adjust the brightness at the blackest point in the image.
Press the PLUS (+) button to brighten dark areas in the
image. Press the MINUS (-) button to darken bright areas in
the image.
NOTE : This adjustment doesn’t work in the sRGB picture
mode.
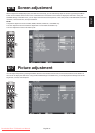
TINT
* For the RGB1, DVD/HD, VIDEO<S>, and VIDEO inputs
only.
When you select TINT by pressing the SET button on the
wireless remote control, the TINT screen appears and you
can adjust the following.
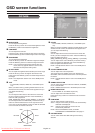
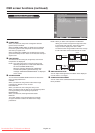
[TINT]:
You can adjust all the colors at the same time. Press the
PLUS (+) button to add a green tint. Press the MINUS (-)
button to add a purple tint.
[RED], [MAGENTA], [BLUE], [CYAN], [GREEN], or [YELLOW]:
You can adjust each color individually. Press the PLUS (+)
button to shift the selected color to the right around the
color circle. Press the MINUS (-) button to shift the selected
color to the left around the color circle.
COLOR
* For the RGB1, DVD/HD, VIDEO<S>, and VIDEO inputs
only.
When you select COLOR by pressing the SET button on the
wireless remote control, the COLOR screen appears and
you can adjust the following.
[COLOR]:
You can adjust all the colors at the same time. Press the
PLUS (+) button to deepen the colors. Press the MINUS (-)
button to lighten the colors.
[RED], [MAGENTA], [BLUE], [CYAN], [GREEN], or [YELLOW]:
You can adjust each color individually. Press the PLUS (+)
button to deepen the selected color. Press the MINUS (-)
button to lighten the selected color.
NOTE : This adjustment doesn’t work in the sRGB picture
mode.
COLOR TEMPERATURE
You can adjust the color temperature.
The image becomes reddish as the color temperature
decreases, and it becomes bluish as the color temperature
increases.
NOTE : This adjustment doesn’t work in the sRGB picture
mode.
GAMMA SELECTION
You can select the gamma mode from NATIVE, S GAMMA,
2.2, 2.4 and OPTION.
NOTE : GAMMA is fi xed to 2.2 in the sRGB picture mode.
NOISE REDUCTION
* For the VIDEO<S> and VIDEO inputs only.
You can adjust the noise reduction level.
Press the PLUS (+) button to increase the value to lessen
the noise.
FILM MODE
You can select the fi lm mode function.
AUTO: Images of 24 frames per second are automatically
detected and displayed.
OFF: Images of 24 frames per second are not
automatically detected.
NOTE : When FILM MODE is AUTO, set SCAN
CONVERSION to PROGRESSIVE. See page 41.
PICTURE RESET
You can reset all the PICTURE settings to the factory
defaults.
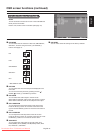
RED MAGENTA
GREEN
Color circle
CYAN
YELLOW BLUE
Downloaded From TV-Manual.com Manuals