


20
Scoring saw correctly aligned for sliding table is
out of alignment on rip fence side and vice-
versa.
Chip out on the bottom as alignment of scoring
saw with main blade inconsistent due to
movement of workpiece.
Symptoms of negative free cut:
Back cutting on sliding table side. Workpiece
runs into back of saw blade. Chip out on top.
Machine cutting out of square. Workpiece
moves slightly on sliding table due to pressure of
saw blade, without operator noticing.
Chip out on the bottom as alignment of scoring
saw with main blade inconsistent due to
movement of workpiece.
NOTE: The above test depends upon the riving
knife being properly in line with the blade.
Free Cut (Blade to Rip Fence)
If the free cut on the rip fence side is negative,
the symptoms are fairly obvious. The workpiece
gets stuck between the back teeth and the fence
and, in the worst case gets kicked back.
If the free cut is positive, other problems arise
which are not so easily recognized, as for
example, an incorrect rip fence setting. The
following procedure will help you compare the
distance between front teeth and rip fence with
the distance between back teeth and rip fence:
1. Lower scoring blade all the way down, and
out of the way.
2. Raise main blade to its highest position.
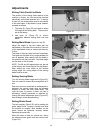
3. Take a workpiece of convenient size (e.g.
12" x 18") and edge one long side using the
sliding table.
4. Set the rip fence slightly narrower than the
workpiece, and cut the opposite long side of
the workpiece using the fence.
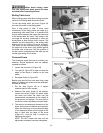
5. Stop the workpiece when the trailing edge is
level with the riving knife (i.e. has passed
the back teeth.)
6. Using the rip fence micro adjustment, move
the rip fence 1/4 turn inward, and pull
workpiece backward almost to sawblade
middle. The back teeth will then cut, and
where they have cut, the workpiece width
will correspond to the distance between the
back teeth and the rip fence.
7. Remove workpiece in normal cutting
direction.
8. Flip the workpiece over so that the trailing
edge becomes the leading edge and feed
into the saw blade for half the direction
which the back teeth just cut. The width here
will correspond to the distance between the
front teeth and the fence.
Between the teeth marks from the back teeth
and front teeth there will be a small ridge. The
height of this ridge is the free cut over the length
of the saw blade. This ridge should hardly be
visible, but just possible to feel.
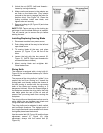
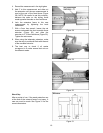
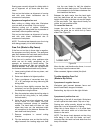
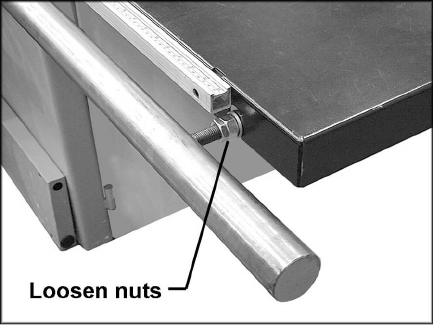
To correct the free cut:
Loosen the nuts on the outside (third) bolt
holding the guide bar on which the rip fence
slides. See Figure 39.
Figure 39
Move the bar, and therefore the fence, in or out
by pivoting it upon the second bolt.
When corrected, tighten outside (third) bolt.
Trouble-shooting Free Cut
(Blade to Rip Fence)
Symptoms of negative free cut:
Workpiece gets jammed between fence and
back of saw blade, danger of kickback.
Backcutting, top chip out to the right of blade.
Symptoms of positive free cut:
Backcutting to the left of saw blade. Workpiece
on left is pulled into back teeth. Chip out on top.
Scoring saw, while correctly aligned on sliding
table side, is out of alignment for ripping.
When the rip fence section is in a pulled back
position, the actual width cut is less than that
shown on the scale.
NOTE: The above check depends on the riving
knife being in line with the blade, not bent,
narrower than the tooth kerf and wider than the
body of the blade.