


9
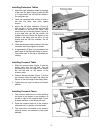
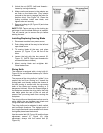
Installing Extension Tables
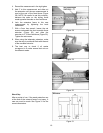
1. Mount the right extension tables to the edge
of the cast iron table (Figure 5) with two M8
x 25 cap screws and two M8 flat washers.
Do not tighten yet.
2. Level the extension table surface to that of
the cast iron table, then firmly tighten
screws.
3. Mount the left table extension (Figure 6)
with two M8 x 20 cap screws and two M8
flat washers to the cast iron table. Then
mount the top of the two braces (Figure 6)
to the table with two M6 flat screws, flat
washers and nuts. Mount the bottom of the
braces to the stand with two M8 x 20 cap
screws and two M8 lock washers. Do not
tighten yet.
4. Level the extension table surface to the cast
iron table, then firmly tighten all screws.
5. A leg assembly (Figure 6) is provided for the
outer edge of the extension table as shown.
The bottom end of the leg is adjustable for
leveling.
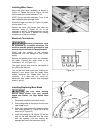
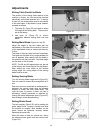
Installing Crosscut Table
1. Slide the crosscut table (Figure 7) onto the
sliding table from the left end. The rod
protruding up from the support arm should
slip into the hole on the bottom of the
crosscut table.
2. Position the two brackets (Figure 7) so that
the crosscut table will easily ride along the
flat bar on the front edge of the sliding table.
3. Tighten the lock lever to secure the table's
position.
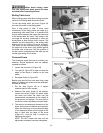
Installing Crosscut Fence
1. The crosscut table has four holes allowing
the fence to be placed in two positions: at
the left or right of the crosscut table. Figure
8 shows the fence in the left set of holes.
2. Place the crosscut fence on to the crosscut
table and lock it in position with the knobs.
3. The cross tube is mounted to the crosscut
table as shown, and secured by two knobs
beneath.
Figure 5
Figure 6
Figure 7
Figure 8