


18-EN
Adjusting and Storing the Parametric
Equalizer Curve
You can modify the Equalizer settings to create a response curve more
appealing to your personal taste.
To adjust the parametric equalizer curve, set the EQ mode to PEQ.
For details, refer to “Setting User's EQ mode” (page 17).
1
Press and hold MENU for at least 2 seconds.
2
Select the Parametric EQ (User’s EQ) mode by
sliding your finger on the GlideTouch bar to the
left or right. Press the GlideTouch bar under the
Parametric EQ (User’s EQ) mode.
3
Press BAND to select the band to be adjusted.
BAND1 → BAND2 → BAND3 → BAND4 → BAND5 → BAND1
4
Select the frequency by sliding your finger on the
GlideTouch bar to the left or right.
Adjustable frequency bands:
20Hz to 20kHz (in 1/3 octave steps)
5
Adjust the level by turning the Rotary encoder.
Adjustable level: -6 to + 6 dB
6
Press SOURCE/POWER to set the band width (Q).
Adjustable band width: 1.0, 1.5, 3.0
7
To adjust another band, repeat steps 3 to 6 and
adjust all bands.
8
When the setting has been completed, press
FUNC. or the GlideTouch bar to activate the
preset mode.
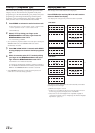
9
Select any one of the preset numbers (1 through 6)
by sliding your finger on the GlideTouch bar to
the left or right. Press and hold the GlideTouch
bar under the desired preset for at least 2 seconds
to store the adjusted contents.
10
After setting, press and hold MENU for at least 2
seconds to return to normal mode.
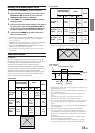
• The frequencies of adjacent bands cannot be adjusted within 4 steps.
• This function is inoperable when DEFEAT is set to ON (page 17).
• If MENU is pressed while adjusting or setting items in the MENU
mode, the unit will return to the previous selection screen.
• By pressing the GlideTouch bar under RETURN in the MENU
mode, the unit returns to the normal mode.
• If no operation is performed for 60 seconds, the unit returns to
normal mode.
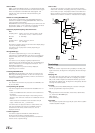
Adjusting and Storing the Graphic Equalizer
Curve
You can modify the equalizer settings to create a response curve to
your personal taste. To adjust the graphic equalizer curve, set the EQ
mode to GEQ. For details, refer to “Setting User's EQ mode” (page
17).
1
Press and hold MENU for at least 2 seconds.
2
Select the Graphic EQ (User’s EQ) mode by sliding
your finger on the GlideTouch bar to the left or
right. Press the GlideTouch bar under the
Graphic EQ (User’s EQ) mode.
3
Press BAND to select the band to be adjusted.
BAND1 → BAND2 → BAND3 → BAND4 → BAND5 → BAND6
→ BAND7 →BAND1
4
Adjust the level by turning the Rotary encoder.
Adjustable output level: -6 to + 6 dB
5
To adjust another band, repeat steps 3 and 4, then
adjust all bands.
6
When the setting has been completed, press
FUNC. or the GlideTouch bar to activate the
preset mode.
7
Select any one of the preset numbers (1 through 6)
by sliding your finger on the GlideTouch bar to
the left or right. Press and hold the Glide Touch
bar under the desired preset for at least 2 seconds
to store the adjusted contents.
8
After setting, press and hold MENU for at least 2
seconds to return to normal mode.
• This function is inoperable when DEFEAT is set to ON (page 17).
• If MENU is pressed while adjusting or setting items in the MENU
mode, the unit will return to the previous selection screen.
• By pressing the GlideTouch bar under RETURN in the MENU
mode, the unit returns to the normal mode.
• If no operation is performed for 60 seconds, the unit returns to
normal mode.