


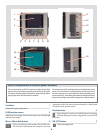


9
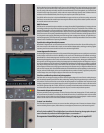
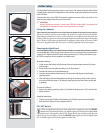
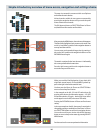
Ready light indicator 6
Flashes green to indicate that the digital back is performing an
operation (such as saving a new capture) and is not available for
new commands. Flashes green when the back is ready.
Navigation button 7
A four-way rocker button enabling you to step through
preview images and navigate the menu system. To use it,
press the side of the button that corresponds to what you wish to
do (e.g., move up, le, right or down).
Zoom-out button / SELECTION (– button) 8
Zoom-out button (to make the view smaller) for the preview
image. You can continue to zoom out to view several small
images at once and nally to view and select batches and media.
Also acts as a selection button for value setting on the menu.
Zoom-in button / SELECTION (+ button) 9
Zoom-in button (to make the view larger) for the preview
image. Also acts as a selection button when viewing available
image batches, media and value setting on the menu.
Instant Approval / (OK) button 10
is button steps through the three approval levels,
thereby assigning an approval status to the image
currently displayed (or selected) in the preview screen (part of
the Instant Approval Architecture system). e colour coding is
based on the trac signal convention of green, amber (yellow)
and red.
Also acts as a conrmation button (OK button) for some types
of menu operations, such as deleting images; indicated by a label
beside the button on the preview screen.
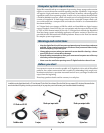
Flash sync IN terminal 11
Used when working with studio / strobe ash units. Allows con-
nection to the unit via the ash sync protector cable to ensure
correct synchronisation as well as providing protection for the
digital back.
Camera communication port 12
Used with certain camera models only. See adapter user manual
for details.
Flash sync OUT terminal 13
Used when working with studio / strobe ash units. Allows con-
nection to the lens sync contact via the ash sync cable to ensure
correct synchronisation
FireWire connector 14
Allows the connection to a computer or Imagebank. e digital
back requires an 800 connecter whereas the computer can be
either an 800 or 400.
Digital back retaining hook slots 15
Accepts digital back/magazine retaining hooks on camera body.
CCD and IR lter 16
is is the light-sensitive element, which is positioned behind a
permanently mounted IR lter. Usually, this assembly will either
be inside the camera or protected by the cover. Always be very
careful not to touch or scratch the surface of the lter when it is
exposed and to replace the plastic cover whenever the digital back
is not mounted on a camera.
WARNING: never attempt to remove the glass lter—you will
probably ruin the CCD if you do so.
See ‘Cleaning the CCD’ section for details.
Databus connectors 17
For communicating with a Hasselblad ELD model camera body or
with a modied Hasselblad 202/203/205 model camera body.
Digital back support slots 18
Accepts digital back/magazine support hooks on camera body.
CF card slot cover 19
Protects card slot.