


KRAMER: SIMPLE CREATIVE TECHNOLOGY
Your 910 Digital Audio Preamplifier
6
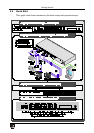
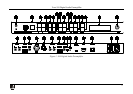
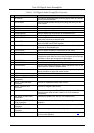
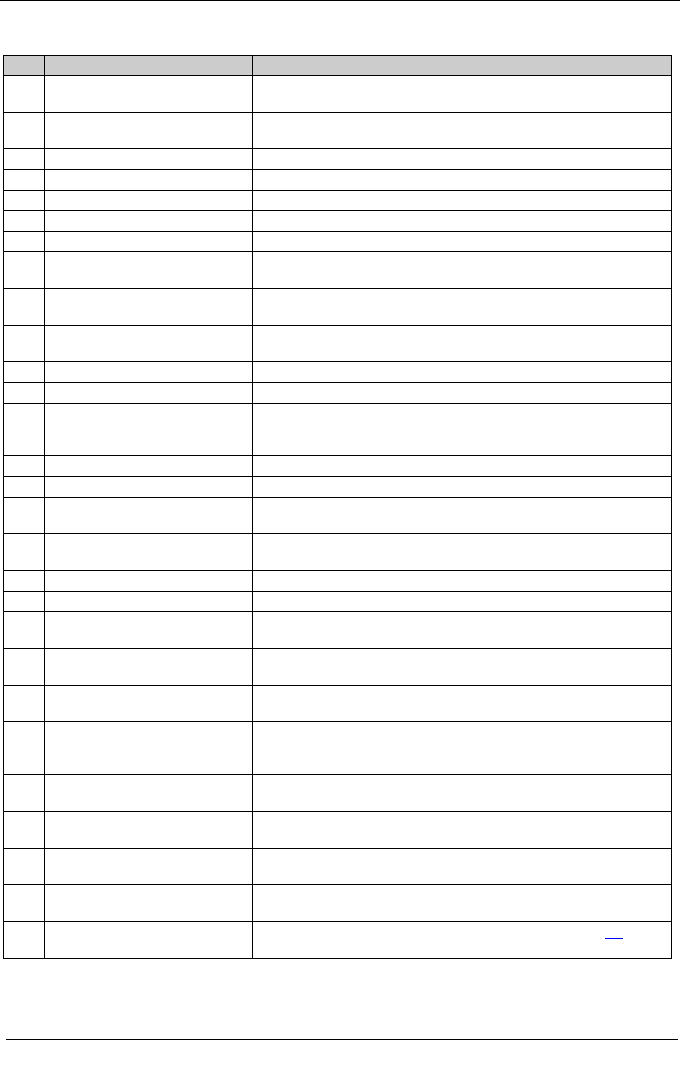
Table 1: 910 Digital Audio Preamplifier Functions
#
Feature
Function
1 IR Receiver The red LED illuminates when receiving signals from the infrared
remote control transmitter
2 MUTE Button Press to toggle between turning off (muting) and turning on the
audio output
3 INPUT Selector Buttons Press a button to select an input (1 to 4)
4 MID Button Press to adjust midrange frequencies on the selected input
5 BASS Button Press to adjust low frequencies on the selected input
6 TREBLE Button Press to adjust high frequencies on the selected input
7 LOUDNESS Button Press to toggle loudness on the selected input
8 EQUALIZER Button Press to adjust 7 different frequency bands on the selected input;
each press advances to the next band
9 VOLUME Button Press to adjust the output volume; to adjust the input volume
press VOLUME and STORE together
10 BALANCE Button Press to change the relative volume between the left and right
channels on the selected input
11 DELAY Button Press to adjust the delay in milliseconds on the output
12 MIX Button Press to choose multiple inputs
13 TALKOVER Button Press to allow the microphone to interrupt the selected input, the
background audio fades out when the microphone is loud enough
and fades in when the microphone is silent again
14 EXPAND Button Press to increase the dynamic range of the output
15 COMPRESS Button Press to decrease the dynamic range of the output
16 STORE Button Press to save the device settings; use the adjustment knob or the
input buttons to select the preset number
17 RECALL Button Press to bring back a stored preset, use the adjustment knob or
the input buttons to select the preset number
18 DISPLAY 2 line, 24 character LCD display
19 Adjustment Knob Turn to adjust the value of the selected function
20 INPUT 1 (LEFT, RIGHT) RCA
Connectors
Connect to an unbalanced stereo audio source
21 INPUT 2 Terminal Block
Connector
Connect to a balanced stereo audio source
22 INPUT 3 S/PDIF RCA
Connector
Connect to a digital audio source
23 INPUT 4 MIC XLR Connector Connect to a microphone. The XLR connector provides 15V
phantom power when the MIC switch is set for a condenser
microphone
24 MIC MODE (DYN/COND.)
Pushbutton
Press IN for dynamic mic, set OUT for condenser mic
25 OUTPUT 1 (LEFT, RIGHT)
RCA Connectors
Connect to an unbalanced stereo audio acceptor (power
amplifier)
26 OUTPUT 2 Terminal Block
Connector
Connect to an balanced stereo audio acceptor (power amplifier)
27 OUTPUT 3 S/PDIF RCA
Connector
Connect to a digital audio acceptor (digital power amplifier)
28 PROGRAM Switch Slide down to upgrade the device firmware (see section 7.4); slide
up for normal operation