


7
8
CQ-VD6503N
English
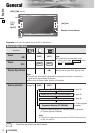
Preparation
You may need to set the following depending on the
devices to be connected.
Subwoofer
¡
Execute (speaker set up) and
(speaker level). (
a
page 38)
Other speakers
¡
Execute (speaker set up). (
a
page 38)
AV1/AV2 (Camcorder,VCR, etc.)
¡
Adjust (AV1/AV2 input level).
(
a
page 39)
SOURCE LEVEL
SP SETUP
SP LEVELSP SETUP
Settings
Warning
¡When you connect external devices to AV1-IN/
AV2-IN (AV1/AV2), be sure to connect the side
brake connection lead (
aInstallation Instructions).
Please refer to the separate “System Upgrade
Guidebook” for how to operate this unit when option-
al devices are connected.
2
3
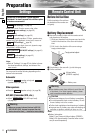
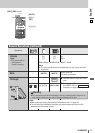
Lithium battery
(CR2025: supplied)
Battery case
Remote Control Unit
Warning
¡Keep batteries away from children to avoid the risk
of accidents. If an infant ingests a battery, please
seek immediate medical attention.
Caution
¡Remove and dispose of an old battery immediately.
¡Do not disassemble, heat or short a battery. Do not
throw a battery into a fire or water.
¡Follow local regulations when disposing of a battery.
¡Improper use of a battery may cause overheating, an
explosion or ignition, resulting in injury or a fire.
Note:
¡Battery Information:
Battery Type: Panasonic lithium battery (CR2025)
Battery Life: Approximately 6 months under normal
use (at room temperature)
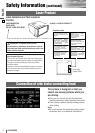
Battery Replacement
q Remove the battery holder with the remote control
unit placed on a flat surface.
q Stick your thumbnail into the groove and push the
holder in the direction of the arrow at the same
time.
w Pull it out in the direction of the arrow using a
tough pointed object.
Before Initial Use
Pull the insulation film out from
the backside of the remote con-
trol gently.
w Put a battery in the case with (+)-side facing up.
e Put the case back.
Tough pointed object
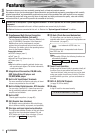
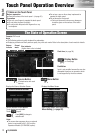
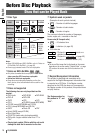
(user settings) (
a
page 34)
display unit, clock, ID code, memory clear, other
(screen settings) (
a
page 36)
dimmer, picture
(audio settings) (
a
page 36)
sound setup, graphic equalizer, CS Auto, speaker setup,
speaker level, time alignment, source level, cross over
(DVD settings) (
a
page 40)
language, display, pro logic, down mix, dynamic range
compression, multiple channel
(AV-IN/OUT settings) (
a
page 41)
source skip
(radio settings) (
a
page 42)
FM set up, AM set up, local
Note:
¡
Refer to “Settings” (
a
page 32) for further informa-
tion about operations, settings, and others of the
menu screen.
RADIO
INPUT/OUTPUT
DVD
AUDIO
SCREEN
USER