


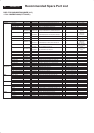
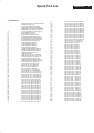
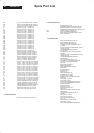
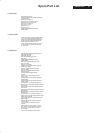


48
200VW8 LCD
2
Monitor drivers (inf file)
FOR WINDOWS 95/98/2000/ME OR LATER
Philips’s monitors build in VESA DDC2B feature to support Plug & Play requirement for Windows 95/98/2000/Me. You can install the
information file(.inf) in order to select your Philips monitor from “Monitor” dialog box in Windows 95/98/2000/Me to activate Plug &
Play application. The installation procedure based on Windows 95 OEM Release 2, 98, Me and 2000 is specified as follows, (in case
of connecting the monitor to the PC compliant with VESA standard with the designated signal cable, the PC reads display pixels,
frequency and color feature of this monitor to optimize the picture for the monitor automatically.)
DDC: Abbreviation for Display Data Channel
** Windows NT 4.0 does not require driver (inf file) for monitor.**
1. Start Windows 95
2. Click the ‘Start’ button,
point to ‘setting’, and
then click ‘control panel’.
3. Double click the
‘display’ lcon.
4. Choose the ‘setting’ tab then
click ‘advanced…’
5. Choose ‘monitor’ button,
point to ‘change…’ then click
‘have disk…’.
6. Click ‘browse…’ button then
choose the appropriate drive
F:(CD-ROM Drive) then click
‘ok’ b utton.
7. Click the ‘ok’ button then
choose your monitor model
and click the ‘ok’.
8. Click ‘close’ button.
For Windows 98
For Windows 98 drivers, our monitors are listed under
2 manufactures name “Philips”, and “Philips
Consumer Electronics Co.” Please select “Philips”
when you would like to set up your monitor in
Windows setting, if you can not find the right model
name just as the label indication on the back of set.
For those set that have been issued since the release
of Window 98, drivers can be found in CD-ROM
under the directory path of “\pc\driver\” or it may be
downloaded at http://www.philips.com
. Once you
have installed the new driver, Windows will add a
new manufacture name “Philips Business
Electronics” in your system.
1. Start Windows 98
2. Click the ‘Start’ button, point
to ‘setting’, and then clock
‘control panel’.
3. Double click the
‘display’ lcon.
4. Choose the ‘setting’ tab then
click ‘advanced…’
5. Choose ‘monitor’ button,
point to ‘change…’
then click ‘next’.
6. Choose ‘display a list of all
the drivers in a specify
location, so you can select
the driver you want’, then
click ‘next’ and then click
‘have disk…’
7. Click ‘browse…’ button then
choose the appropriate drive
F: (RD-ROM Drive)
then click ‘ok” button.
8. Click the ‘ok’ button then
choose your monitor model
and click the ‘next’ button.
9. Click ‘finish’ button then click
‘close’ button.
1. Start Window Me
2. Click the ‘start’ button, point
to ‘setting’ , and then click
‘control panel’.
3. Double click the
‘display’ lcon.
4. Choose the ‘setting’ tab then
click ‘advanced…’.
5. Choose ‘monitor’ button, then
click ‘change…’ button.
6. Choose ‘specify the location
of the driver (advanced)’ and
click the ‘next’ button.
7. Choose ‘display a list of all
the drivers in a specific
location, so you can select
the driver you want’, then
click ‘next’ and then click
‘have disk…’.
8. Click ‘browse…’ button then
choose the appropriate drive
F: (CD-ROM Drive)
then click ‘ok’ button.
9. Click the ‘ok’ button then
choose your monitor model
and click the ‘next’ button.
10. Click ‘finish’ button then
click ‘close’ button.
For Window Me
For Windows 2000
1. Start Windows 2000
2. Click the ‘start’ button, point
to ‘setting’, and then click
‘control panel’.
3. Double click the
‘display’ lcon.
4. Choose the ‘setting’ tab then
click ‘advanced…’.
5. Choose ‘monitor;
- If the ‘properties’ button is
inactive, it means your
monitor is properly configured.
Please stop installation.
- If the ‘properties’ button is
active, click ‘properties’ button.
6. Click ‘driver’ and then click on
‘update driver…’ then click on
the ‘next’ button.
7. Choose ‘display a list of the
known drivers for this device
so that I can choose a specific
driver’ then click ‘next’ and
then click ‘have disk…’.
8. Click ‘browse…’ button then
choose the appropriate drive
F: (CD-ROM Drive).
9. Click the ‘open’ button then
click the ‘ok’ button.
10. C hoose your monitor model
and click the ‘next’ button.
11. Click ‘finish’ button and then
click the ‘close’ button. If you
can see the ‘digital signature
not found’ window then click
the ‘yes’ button.
For Windows 95
For Windows 95 drivers, your
monitor is listed under
manufacture name “Philips
Business Electronics Co.”.
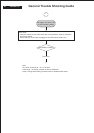
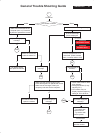
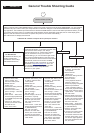
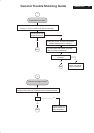
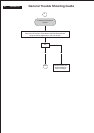
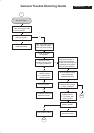
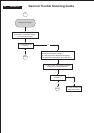
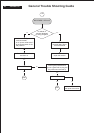
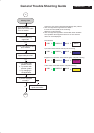
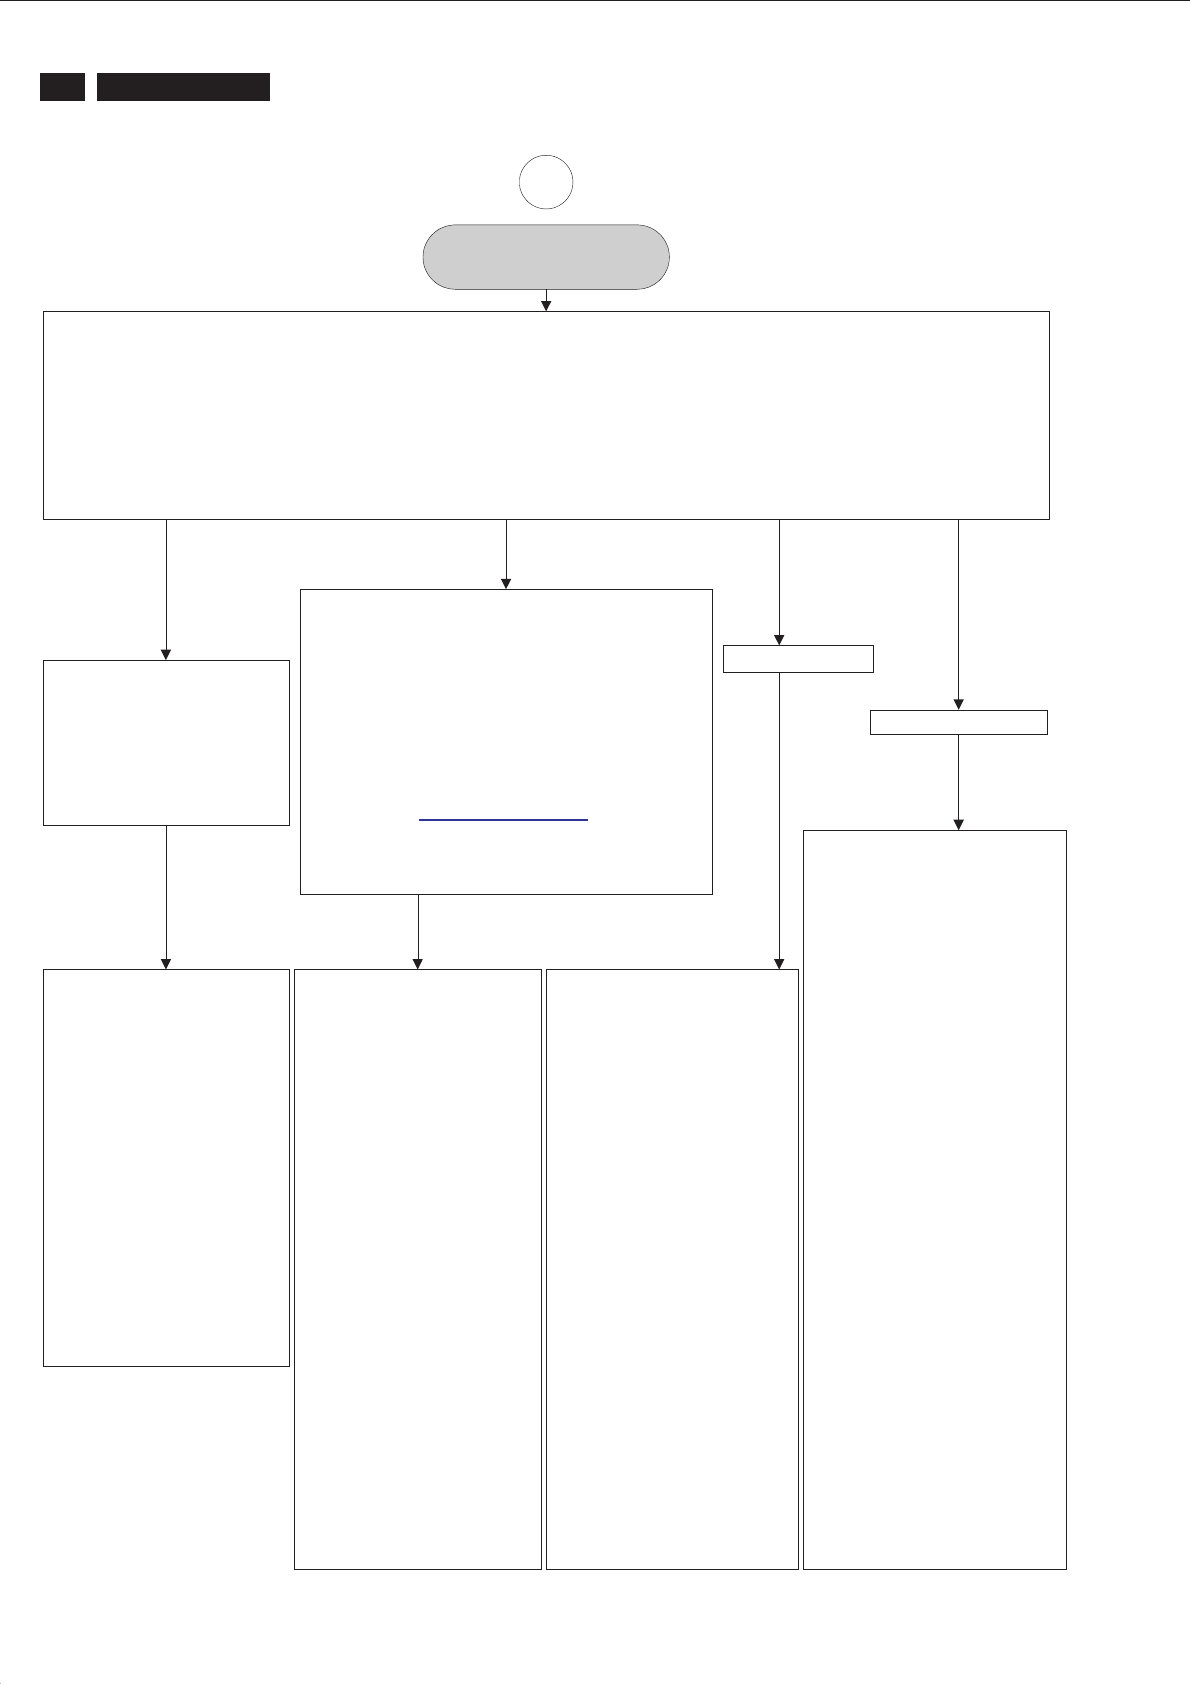
General Trouble Shooting Guide