


WWW.POLKAUDIO.COM/AMPS
13
ENGLISH
PA 12V AMPLIFIERS
12
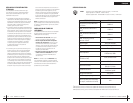
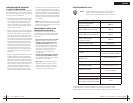
PA250.2 PowerOutput:90 WattsRMS x2 channelsat 4Ohms and≤1%THD+N
SignaltoNoise Ratio:-70 dBA(reference 1Watt into4 Ohms)
AdditionalPower:125 WattsRMS x2 channelsat 2Ohms and≤1%THD+N
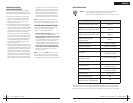
SPECIFICATIONS
PA250.2
Dynamic Power Rating @ 2 Ohms 200W x 2
RMS Continuous Power @ 2 Ohms
2
125W x 2
RMS Continuous Power @ 4 Ohms
1
90W x 2
RMS Continuous Power
Bridged 4 Ohms
3
250W x 1
Signal-to-Noise Ratio Greater than 90 dB
Frequency Response 20-20,000 Hz +_ 0.25 dB
Damping Factor Greater than 100
Crossover
Switchable high or low pass
12dB/octave, 100Hz
Bass Equalization
(Variable or Fixed)
+8 dB, centered at 40Hz
Input Impedance 20K Ohms
Input Sensitivity
Variable from
250 mV to 7.5 volts
Output Impedance
2 to 8 Ohms, stereo
4 to 8 Ohms, bridged
Supply Voltage 10 to16 VDC
Fusing and Power/Type 30A
Minimum Cable Requirements
(AWG) (Per amp, Trunk Mounted)
#10
1
RMScontinuouspower driveninto 4Ohms from20 to20,000 Hz@14.4VDCwith lessthan 0.08%THD+N.
2
RMScontinuouspower driveninto 2Ohms from20 to20,000 Hz@14.4VDCwith lessthan 0.15%THD+N.
3
RMScontinuouspower bridgedinto 4Ohms from20 to20,000 Hz@ 14.4VDCwithlessthan 0.15%THD+N.
CEA SPECIFICATIONS
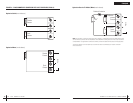
CROSSOVER SETTINGS
AND GAIN ADJUSTMENT
YourPolkAudio poweramplifier needsto beadjusted
carefullytoachieve maximumperformance. Theseare
someguidelinesto followwhen fine-tuningthe amplifier.
• Forfull-rangeand simultaneousstereo/mono bass
applications,thecrossover selectionswitch should
besetto FULL.If theamplifier isdriving yoursub-
woofers,setthe switchto LOW,and formid-bass/
midrangeoutput,set toHIGH.
• Thecrossoverfrequency control needsto beadjusted
tosuityour particularsystem. Forsubwoofer appli-
cations,tryand keepthe settinglow enoughto prevent
imagesmearing(you shouldnot beable tohear male
voicesfromthe subwoofer)but notso lowas tocreate
a gapbetweenthe subwooferand themid-bass/
midrangespeakers.For mid-bass/midrangesettings,
trytokeep thesetting lowenough tokeep yoursound
stageinfront ofyou, withoutoverdriving thespeaker.
Itwillbe toyour advantageto spendsome extratime
withthisadjustment, listeningto familiarmusic or
systemset-updiscs toachieve thekind ofmusical
reproductionthatyou prefer.
• Thegainadjustment allowsyou toset propersignal
matchforclean, quietamplifier operation.For full-range
andsimultaneousstereo/mono bassapplications, start
byplayingsome musicyou arefamiliar with.With the
gainadjustmenton theamplifier inthe middleof its
rotation,bringup thevolume onyour headunit tothe
3/4volumesetting oruntil youstart tohear distortion
orclipping.If youhear distortionbefore youreach the
3/4volumesetting ofyour headunit, reducethe gain
settingonthe amplifierand startto raisethe headunit
volumeagain.When youcan listento themusic ator
slightlyabove3/4 onyour headunit withoutaudible
distortion,slowlyraise thegain ofthe amplifieruntil
distortionisheard, thenback offthe gainuntil the
distortionisnot audible.This settingwill allowyou
toreachfull outputwith allbut thequietest ofsource
material,whileavoiding excessivenoise inthe system.
NOTE: Polkamplifiersuse adigital gaincontrol with
afinitenumber ofadjustment steps.A verysmall adjust-
mentmaynot causeany audiblechange inlevel.
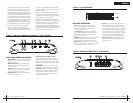
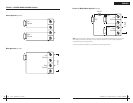
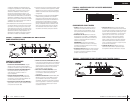
LED TUBE INSTALLATION (OPTIONAL)
ThesePolkAudio amplifiershave beendesigned with
acustomheat sinkthat canaccommodate two
(optional—notsupplied)VARAD LEDtubes.
1.Before installingthe LEDtubes, removeand discard
themountingfeet fromthe VARADLED tubes.
2.Slide eachLED tubeassembly intoyour PolkAudio
amplifierheatsink. Ensurethat theLEDs arefacing
outforoptimal visibility.The wiresfrom theLED tube
assemblyshouldbe onthe signalinput endof the
amplifier.TheBlack wirefrom theLED tubeis ground
andtheBlack/White wirefrom theLED tubeis power.
3.Run thetwo wiresfrom thetube assemblyand
connectthemto the4-pin LED/FANinput connec-
tor.Referto theLED/FAN harnessdiagram given
earlierinthis manual.
NOTE:Ifthe optionalfan ISNOT beingused, werecom-
mendthatthe secondLED tubebe wiredto thiscircuit.
Iftheoptional fanis beingused, werecommend thatthe
secondLEDtube bewired inparallel withthe firstLED tube.