


38
11. INPUT MODE (Selecting the initial input mode of the sources connected to the
TV/DBS and DVD/VCR 3 input terminals)
For the sources connected to the TV/DBS and DVD/VCR 3
input terminals of this unit only, you can designate the input
mode that is automatically selected when the power of this unit
is switched on.
AUTO: In this position, the AUTO input mode is always
selected when the power of this unit is switched on.
LAST: In this position, the input mode you have selected the
last time is memorized and will not be changed even if
the power of this unit is switched on.
* Refer to page 41 for details about switching the input mode.
Operating method
After selecting this function (title) in step 1 on page 32, press
the + or – key. Next select the input source TV/DBS or
DVD/VCR 3 by pressing the or key so that the arrow
points to its name, and then select the AUTO or LAST mode
by pressing the + or – key.
12. DIMMER (Changing brightness of the display panel)
You can adjust brightness of the display panel in five degrees.
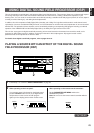
10. VCR 3 VIDEO (Switching the DVD/VCR 3 VIDEO OUT terminal to a second monitor out
terminal.)
If you wish to connect a second monitor TV (or a projector) to
this unit, select “MONTR” position. The DVD/VCR 3 VIDEO
OUT terminal (and S VIDEO terminal also) is switched to a
second monitor out terminal, so you can connect this terminal
to the video input terminal of another monitor TV.
Notes
• Even in the “MONTR” position, the DVD/VCR 3 VIDEO IN
terminal can be used as a normal video signal input terminal
and the DVD/VCR 3 AUDIO SIGNAL IN/OUT terminals as
normal audio input/output terminals.
• If using the DVD/VCR 3 terminals for connecting a third
video cassette recorder only, be sure to select “REC OUT”
position.
If the picture on the monitor is disturbed while the third
video cassette recorder is functionning, “MONTR” position
may be selected. If so, select “REC OUT” position.