ISM 824 Multiswitcher Software, cont’d
ISM 824 Integration Scaling Multiswitcher • ISM 824 Multiswitcher Software
5-10
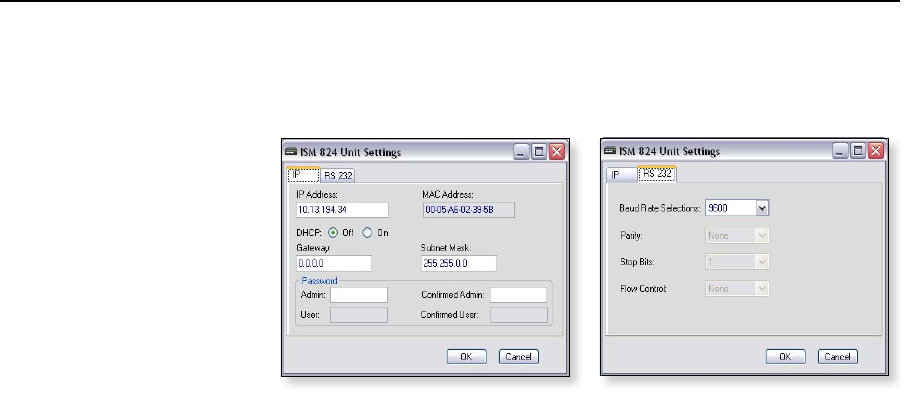
• Unit Settings — Click on this to open the settings window. This window has
two tabs, IP and RS-232, each of which shows the setting for the host controller
connection to the ISM 824 (see figure 5-13).
Figure 5-13 — ISM 824 Unit Settings menus − IP and RS-232 windows
IP Settings tab — This window displays the following settings:
IP address (default is 192.168.255.255), DHCP status (On or Off, default
is Off), Gateway address (default is 0.0.0.0), MAC Address (this cannot
be changed), Subnet address (default is 255.255.0.0), Admin and User
login passwords. To change any of these settings do the following:
IP address — Enter a suitable IP address and click OK. The new
address is uploaded to the ISM 824.
N
For this, and other operations, clicking Cancel exits the operation without
making any changes.
N
See chapter 6, “HTML Operation” for information about DHCP, IP, Gateway,
Subnet, and MAC address formats. See Appendix A for Subnetting details.
Gateway address — Enter a suitable Gateway address and click OK.
The new address is uploaded to the ISM 824.
MAC address — This address cannot be changed. The MAC address
is an unique identifier for each ISM 824, and is hard coded in the device.
Subnet address — Enter a suitable Subnet address and click OK. The
new address is uploaded to the ISM 824.
Password – Enter suitable admin and user passwords as desired.
Click OK. This sets the passwords for user and admin control.
RS-232 Settings tab — This window displays the following settings:
Baud Rate selections (default is 9600), Parity (default is none), Stop Bits
(default is 8), and Flow Control (default is none).
To change these settings do the following:
Baud Rate — Select a suitable Baud rate from the drop down list and
click OK. The new Baud rate is uploaded to the ISM 824.
Parity – This cannot be changed from this window.
Stop Bits – This cannot be changed from this window.
Flow Control – This cannot be changed using this window.
• Unit Reset... — Select this to reset the ISM to factory defaults. A warning
window stating “This unit will reset back to factory defaults” appears before
resetting. Click OK to proceed. Reset will commence after a short delay. A
progress bar (“Initializing...”) fills green during the reset process.


