


27
Connecting the AV receiver—Continued
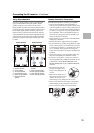
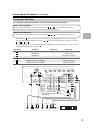
By connecting both the audio and video outputs of your DVD/BD player and other AV components to the AV receiver,
you can select both the audio and video simultaneously simply by selecting the appropriate input source on the AV
receiver.
The AV receiver supports several connection formats for compatibility with a wide range of AV equipment. The format
you choose will depend on the formats supported by your other components. Use the following sections as a guide.
Video Connection Formats
Video equipment can be connected to the AV receiver by using any one of the following video connection formats:
composite video, S-Video, component video, or HDMI, the latter offering the best picture quality.
The AV receiver can upconvert and downconvert between video formats, depending on the “Monitor Out” setting, which
generally determines whether video signals are upconverted for the component video output or the HDMI output.
For optimal video performance, THX recommends that video signals pass through the system without upconver-
sion (e.g., component video input through to component video output).
It is also recommended that you press the [VCR/DVR] and [RETURN] buttons on the AV receiver at the same
time. Select “Skip” in the “VideoProcessor” setting on the display. To reset back to the original setting, press the
same button at the same time.
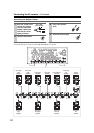
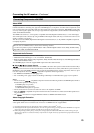
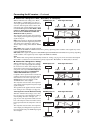
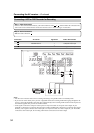
■ “Monitor Out” Setting Set to “HDMI Main” or “HDMI Sub”
With the “Monitor Out” setting set to “HDMI
Main” or “HDMI Sub” (see page 47), video input
signals flow through the AV receiver as shown,
with composite video, S-Video, and component
video sources all being upconverted for the
HDMI output. Use the “HDMI Main” or
“HDMI Sub” setting if you connect the AV
receiver’s HDMI OUT MAIN or HDMI OUT
SUB, respectively, to your TV.
The composite video, S-Video, and component
video outputs pass through their respective input
signals as they are.
Note:
If not connected to the same output you have
selected in the “Monitor Out” setting, the “Mon-
itor Out” setting will be automatically switched
to “Analog” (see page 47). In this case, the set-
ting of the output resolution will be that for HDMI output (see page 47). However, it will be switched to “1080i” when
“1080p” is selected, and to “Through” when “Auto” is selected.
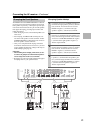
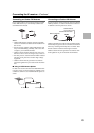
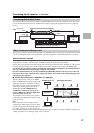
Connecting Both Audio & Video
: Signal Flow
Video
Audio
Video
Audio
Speakers
(see page 20 for connection information)
DVD/BD player, etc.
TV, projector,
etc.
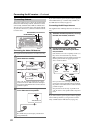
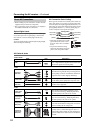
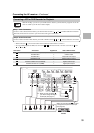
Which Connections Should I Use?
IN
MONITOR OUT
DVD/BD player, etc.
AV receiver
TV, projector, etc.
Composite
Composite
S-Video
S-Video
Component
Component
Video Signal Flow Chart
HDMI
HDMI