Black plate (17,1)
This functionis used to updatethis unit withthe
latest Bluetoothsoftware. For about Bluetooth
software andupdating, refer to ourwebsite.
! Never turnthe unit offwhile the Bluetoothsoft-
ware isbeing updated.
1 Press M.C. tostart updating.
Followthe on-screen instructionsto finish up-
dating theBluetooth software.
SXM RESET(SiriusXM Reset)
The SiriusXMsettings will bereset to the default
settings.
1 Press M.C. todisplay the settingmode.
2 TurnM.C. to switchto YES.
! To cancel,turn M.C. todisplay CANCEL.
3 Press M.C. toselect.
! A COMPLETEDmessage will appearonce
the settingshave been reset.
System menu
1 Press and hold SRC/OFF untilthe unit
turns off.
2 Press M.C. to display the mainmenu.
3 Turn M.C. to change the menu option
and press to select SYSTEM.
4 Turn M.C. to select the system menu
function.
For details,refer to System menu on page 14.
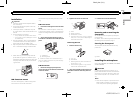
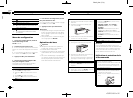
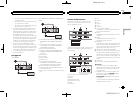
Using an AUX source
1 Insert the stereo mini pluginto the AUX
input jack.
2 Press SRC/OFF to select AUX asthe
source.
Note
AUX cannot be selected unless theauxiliary set-
ting is turned on. For more details, refer to AUX
(auxiliary input) on page 14.
Switching the display
Selecting thedesired text information
1 Press DISPto cycle between thefollowing:
! Source name
! Source nameand clock
If an unwanted display appears
Turn off the unwanted display using the proce-
dures listed below.
1 Press M.C. to display the mainmenu.
2 Turn M.C. to change the menu option
and press to select SYSTEM.
3 Turn M.C. to display DEMO OFF and press
to select.
4 Turn M.C. to switch to YES.
5 Press M.C. to select.
SiriusXM Satellite Radio
Only for DEH-X6600BS and DEH-X3600S
You can use this unit to control SiriusXM Con-
nect Vehicle Tuner, which is sold separately.
For more informationon how to install SiriusXM
Connect Vehicle Tuner, consult the installation
guide included with the tuner.
Everything worth listening to is on SiriusXM, get-
ting over 130 channels, including the mostcom-
mercial‐free music, plus the best sports,news,
talk and entertainment. A SiriusXM Vehicle
Tuner and Subscription are required.For more
information, visit www.siriusxm.com.
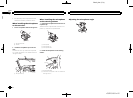
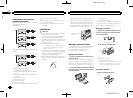
To subscribe to the SiriusXM
Satellite Radio service
1 Switch the source to SIRIUSXM.
You should be able to tune in to Channel 1.If
you cannot get Channel 1, make sure thatyour
SiriusXM Connect Vehicle Tuner is installed cor-
rectly as described in the tuner installation
guide.
2 Switch to Channel 0 and check theRadio
ID.
The SiriusXM Radio ID canbe found by tuning
to Channel 0. In addition, theRadio ID is located
on the bottom of the SiriusXM Connect Vehicle
Tuner.
Please note that the SiriusXM Radio ID does not
include the letters I, O, S or F.
You will need this number to activate your sub-
scription.
3 Activate the SiriusXM service online or
by phone.
For USSubscriptions:
! Visit www.siriusxm.com/activatenow
! Call SiriusXMListener Care at1-866-635-2349
For Canadian Subscriptions:
! Visit www.xmradio.caand click on“ACTIVATE
RADIO” inthe top right corner
! Call 1-877-438-9677
# The SiriusXMsatellites will send anactivation
message toyour tuner. Whenthe tuner hasreceived
the message,“SUBSCRIPTION UPDATED” isdis-
played. Press any keyto clear theactivation mes-
sage.
The activationprocess usually takes10 minutes to
15 minutesbut may takeup to an hourin some
cases. Donot turn off theunit until youclear the ac-
tivation messageby pressing anykey.
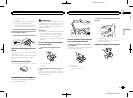
Basic operations
Selecting aband
1 Press BAND/
.
! Band canbe selected fromSXM1, SXM2
or SXM3.
Returning tothe current livebroadcast
1 Press andhold BAND/
.
Selecting achannel
This functionis available whenCHANNEL is se-
lected inOPERATE MODE.
1 Press c ord.
! By pressingand holding cor d, youcan in-
crease ordecrease the channelnumber con-
tinuously.
Skip backwardor forward
This functionis available whenREPLAY is se-
lected inOPERATE MODE.
1 Press c toskip back.
Pressd to skipforward.
Fast forwarding or fast rewind
This functionis available whenREPLAY is se-
lected inOPERATE MODE.
1 Press andhold c to fastrewind.
Pressand hold dto fast forward.
Note
For detailsabout OPERATEMODE, refer to
OPERATE MODE (operation mode setting) on
page 18.
English
Using this unit
17
Section
Available accessories
En
02
03
<QRD3195-A>17