


MAN 650066:D
17
SPEEDOMETER SETUP/CALIBRATION
There are two main methods for calibrating the speedometer, auto cal and adjust. Auto
cal requires that you have one measured mile marked out (1 km for metric). Adjust requires you
to follow another vehicle going at a set speed, using a handheld GPS with speedometer
function, or timing yourself over a mile to determine your speed.
* Dakota Digital recommends you start with the Auto Cal method to get the speedometer
close. If you find it’s reading too fast/slow after the Auto Cal, then attempt the Adjust
mode.
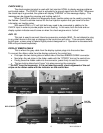
• Press and hold SW1, then turn the key on and start the engine.
• Once the engine is running, release SW1. SE
S
ESE
SET
SPEED
SPEED SPEED
SPEED should be displayed.
• Press and hold the switch until -
--
- SPEED
SPEED SPEED
SPEED is displayed to go into the speed setup menus,
release SW1.
• Now you can press and release the switch to scroll through the sub-menus, “sender
sendersender
sender” “auto
autoauto
auto”
“adjust
adjustadjust
adjust” “S
SS
Servic
ervicervic
ervic” “output
outputoutput
output” “DONE
DONEDONE
DONE”. When you get to the desired sub-menu press and
hold the switch to select it.
Speed sensor setup (SENDER
SENDERSENDER
SENDER)
This menu is used to set the speed sensor input type. You can use the supplied pulse
generator or existing speed sensor for most applications. You can also read the speed signal
with the use of a future product called the bus interface module (BIM). Dakota Digital also offers
BIM that will allow you to read the speed signal from an ECU if you are installing the system in a
vehicle equipped with the OBDII port or a drivetrain from a newer vehicle, most 1996 and newer
vehicles have this.
If you are using a Dakota Digital pulse generator or feeding an ECU signal into the SPD
SND terminal, this is considered a “normal
normalnormal
normal
”
””
”
signal.
• When “sender
sendersender
sender” is displayed press and hold SW1 until you get “ - ”
• Release SW1 and the current sensor selection will be displayed
• Press and release SW1 to toggle between “normal
n
ormalnormal
normal” and “BUS
BUSBUS
BUS”
• When the desired setting is displayed press and hold SW1 until “ - ” “DONE
DONEDONE
DONE” is displayed
• Release the switch to go onto the next sub menu item.
Auto Cal (AUTO
AUTOAUTO
AUTO)
This menu is used to calibrate the speed signal by driving a measured mile (or kilometer)
• When “AUTO
AUTOAUTO
AUTO” is displayed press and hold SW1 until you get “ -
--
- ”
• Release SW1 and the primary speed unit will be displayed
• Press and release SW1 to toggle between “MPH
MPHMPH
MPH” for miles per hour or “KMH
KMHKMH
KMH” for kilometers
per hour. The setting saved here will be what the speedometer reads as well as the
units used to calculate odometer mileage.
• When the desired unit is displayed press and hold SW1 until you see the “ - ” then release
SW1.
The speedometer will display “CAL
CALCAL
CAL” and the odometer should be reading “000000
000000000000
000000”, the
other displays should be lit and display normally(fuel, volt, water, and oil). Begin driving the
measured mile. The odometer reading should start incrementing as you travel, indicating the
pulses received from the speed sensor or VSS. This is known as the pulses per mile (PPM).
Once you reach the end of the marked mile, or are passing the marker, press and release SW1.
The displays will flash off, then everything should light up and the speedometer should now be
displaying your speed. Auto Cal is now complete and your speedometer should be reading
correctly.