


MAN 650066:D
22
Temp sensor test (test
testtest
test)
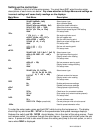
This menu will allow you to check the resistance the control box is reading from the water
temp sensor. This can be used for a diagnostic tool if you are having troubles or feel that the
reading is incorrect. For the Dakota Digital SEN-04-5 the resistance decreases as temperature
increases. Typical values for the Dakota Digital SEN-04-5 sensor are:
100F = 500 ohms, 200F = 75 ohms, and 300F = 19 ohms
If the gauge reads “EEE” this is an open connection or no sensor connected. If it is reading “ --”
this is indication of a short.
• When “test
testtest
test” is displayed press and hold SW1 until you get “ - ”
• Release SW1 and the current resistance from the temp sensor will be displayed on the
speedometer and “R TEMP
R
TEMPR TEMP
R TEMP” is displayed on the odometer readout.
• Press and release SW1 to scroll through the next sensor input if you wish “v oil
v oilv oil
v oil” “R fuel
R fuelR fuel
R fuel”
“R temp
R tempR temp
R temp”
• Once complete hold SW1 until “ - ” “DONE
DONEDONE
DONE” is displayed
• Release the switch to go onto the next sub-menu item.
Exit water temp setup (done
donedone
done)
This will allow you to exit the water temp setup and go on to the next setup menu.
• When “Se
SeSe
Set
done
donedone
done” is displayed, press and hold SW1 until you get “ -
--
- DONE
DONE DONE
DONE ”
• Release the switch to go onto the next menu
OIL PRESSURE SETUP
Dakota Digital only offers one pressure sensor for this system, SEN-03-8, 0-100 psi solid
state sensor with 1/8” NPT threads. The oil pressure setup allows you set up a low pressure
warning point that will cause the display to flash whenever the reading on the display is lower
than the set point. There is also a test mode that will display the voltage from the sensor for
trouble shooting assistance.
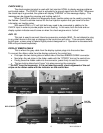
• Press and hold SW 1 while turning the key on.
• Release the switch, then press and release SW1 to get to the “OIL
O
ILOIL
OIL” setup menu.
• Press and hold the switch until - oil is displayed enter the oil pressure setup menus, then
release SW1.
• Press and release the switch to scroll through the oil sub-menus, “WARN
WARNWARN
WARN” “test
testtest
test” “DONE
DONEDONE
DONE”.
When you get to the desired sub-menu, press and hold the switch to select it.
Oil pressure warning setup (WARN
WARNWARN
WARN)
This menu will allow you to select the low pressure warning point. When the display
value is lower than this point, the OIL display will flash. The value is adjustable from 5 – 36 psi.
• When “WARN
WARNWARN
WARN” is displayed, press and hold SW1 until you get “ - ”
• Release SW1 and the current warning point will be displayed.
• Press and release SW1 to increase the value from “LO 05
LO 05LO 05
LO 05” – “lo 36
lo 36lo 36
lo 36”
• When the desired value is displayed press and hold SW1 until “ - ” “DONE
DONEDONE
DONE” is displayed
• Release the switch to go onto the next menu item.