


MAN 650066:D
4
MOUNTING KITS INTO ORIGINAL DASHES
Some kits will include a separate mounting instruction sheet so please see that first for
system mounting instructions. Some systems will attach directly to the bezel, and others will
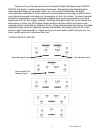
mount back into the instrument cans where the factory gauges where mounted. There are three
basic system mounting configurations read on to identify your system and how to mount it.
It may be necessary to trim or remove some plastic or bezel material depending on the system.
You may also need the following tools and materials to complete a system install depending on
the vehicle
• Screw drivers
• Nut drivers
• Side cutters
• Die grinder
• Cut off wheel
• Silicone / RTV
Complete Systems mounted in new bezel
If your system came from Dakota Digital with a new bezel, installation on the system
should be straight forward. Remove the factory gauges and bezel and install the new one.
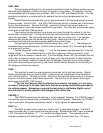
Systems that have a glue-in lens (loose lens with no mounting holes in it)
If your system included a front lens separate from the displays and contains no mounting
holes, you have a glue-in lens system. The lens will be secured to the original bezel using RTV.
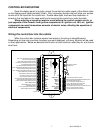
When installing the display system into the original bezel, several steps must be taken to
prepare the bezel. The first is to remove the cluster from the dashboard. Next, remove all
instrumentation from the bezel as well as the factory lens. You will generally be left with a bare
plastic or metal bezel. Remove any felt inserts from the back side of the bezel that sit between
the lens and the bezel.
Next, take the supplied lens, remove any masking that may be on it and with the lettering
facing the front of the dash, place it in the bezel. Lay a bead of RTV around the back side of the
lens to secure it in place. After the RTV has cured, the display panel is ready to be placed on
the bezel. If studs were supplied with the panel, screw them into the bezel and place a nut on
them before placing the display system on it.
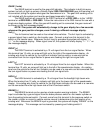
Systems that mount into original cans with hardware (lens and systems screw together)
If the system came with the lens and system attached together, the compete assembly
should either mount into the original cans or secure directly to the bezel. Some systems may
come with a new can or housing over the back of the system that should make mounting very
apparent. If you have a version with a system and lens attached to ABS plastic, you will need to
secure these to the original cans or instrument housings.
First, remove the cluster from the dashboard. Next, remove all instrumentation from the
bezel as well as the factory lens. You should essentially be left with a bare bezel, possibly
reusing any clear lenses that were covering the factory gauges. If you have a system that came
in a new can or has an ABS subpanel that fits over the factory bezel, you can secure it back to
the bezel and re-install into the car.
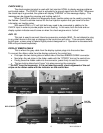
If your system mounts into the cans, continue removing the stock gauges as well as other
lights and loose parts from the instrument cans as the display systems typically sit flat into the
can so everything must be removed. Once the cans are cleared, the system should fit into the
can and secure from the back of the can with screws. The ABS sub-panel should have some
mounting holes and supplied hardware for securing the system to the can. Once system is
secure, reattach cans to the bezel and re-install into the car.