


1
1. MOUNTING, WIRING
1.1 Preparation
Mounting method
You can install the monitor unit as follows. See the outline drawings at the back of this manual for
mounting dimensions.
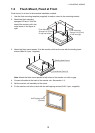
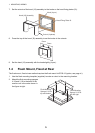
• Flush mount, fixed at front (standard)
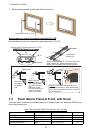
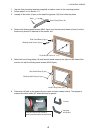
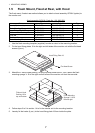
• Flush mount, fixed at front, with hood (option)
• Flush mount, fixed at rear (option)
• Flush mount, fixed at rear, with hood (option)
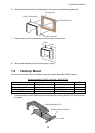
• Tabletop mount (option, hood-mountable)
• Flush mount a series side by side, fixed at rear
Note 1: The face of the LCD is made of glass. Handle it with care.
Note 2: For flush mount, take care so that the monitor unit does not fall during the installation.
Mounting location
Select a mounting location considering the following points. This equipment is free from electro-
magnetic fields.
• Make sure the mounting location is strong enough to support the weight of the unit.
• Locate the unit away from direct sunlight. An LCD may darken if it is exposed to direct sunlight
for a long time.
• Select a location where the screen can be easily viewed and the controls can be easily operat-
ed.
• Leave enough space around the unit for service and maintenance. See the outline drawings at
the back of this manual for minimum service clearance.
• Locate the unit away from areas subject to water splash and rain.
• Observe the compass safe distances (see page iii) to prevent interference to a magnetic com-
pass.
Run cables before installing the monitor unit
Run all cables before you install the monitor unit. See the interconnection diagram at the back of
this manual.