


1. MOUNTING, WIRING
7
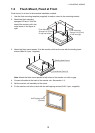
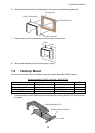
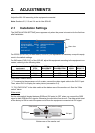
1.5 Flush Mount, Fixed at Rear, with Hood
The flush mount, fixed at rear method allows you to attach a hood assembly OP26-6 (option) to
the monitor unit.
Hood assembly OP26-6 (Code No.: 001-080-930)
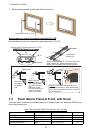
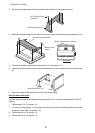
1. Use the flush mounting template (supplied) to make a cutout in the mounting location.
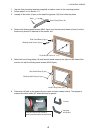
2. Fix the hood fixing plates 19 to the right and left sides of the monitor unit with the flat head
screws (6 pcs.).
3. Attach the F-mount hood packing 19 to the top and bottom brims. Then, attach the flush
mounting sponge V 19 to the right and left brims of the monitor unit from the rear side.
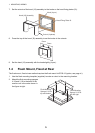
4. Follow steps 3 to 9 in section 1.4 to fix the monitor unit to the mounting location.
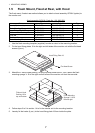
5. Loosely fix the knobs (4 pcs.) to the hood fixing plate 19 from inside the plate.
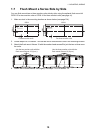
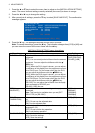
Name Type Code No. Qty
Hood (19) Assembly OP26-6-1 001-080-970 1
Flush Mounting Sponge V 19 26-005-3124 100-351-560-10 2
Hood Fixing Plate 19 26-005-3302 100-351-611-10 2
F-Mount Hood Packing 19 26-005-3305 100-351-620-10 2
Knob M4 03-163-2303 100-343-602-10 4
Flat Head Screw M3x8 000-172-167-10 6
Flush Mounting Template C42-00910 000-172-637-10 1
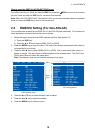
Hood Fixing Plate 19
Flat Head Screw
F-Mount Hood
Packing 19 for
top and bottom
Flush Mounting
Sponge V 19 for
left and right