


1. MOUNTING, WIRING
4
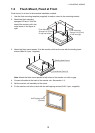
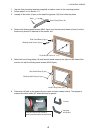
1. Use the flush mounting template (supplied) to make a cutout in the mounting location.
2. Follow steps 2 to 6 in section 1.2.
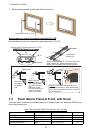
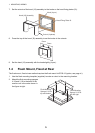
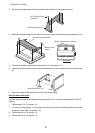
3. Loosely fix the knobs (4 pcs.) to the hood fixing plates (19) from inside the plates.
4. Remove the binding head screws (M3x5, 6pcs.) and the side panel bases (6 pcs.) from the
flush mount panels 19 attached to the monitor unit.
5. Attach the hood fixing plates (19) and the side panel bases to the right and left sides of the
monitor unit with the binding head screws (M3x8, 6pcs.)
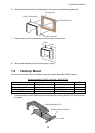
6. Press and rub folds on the hood with your hands to make creases clearly. The degree of
creases should be within 90° when the hood is opened.
Hood Fixing Plate (19)
Knob
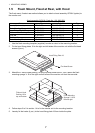
Side Panel Base (6 pcs.)
Binding Head Screw (6 pcs.)
Flush Mount Panel 19
Side Panel Base (6 pcs.)
Binding Head Screw (6 pcs.)
Hood Fixing Plate (19)
Hood
Correct
Improper
insufficient
Press and move your hands to
upward and downward several times.