


1. MOUNTING, WIRING
3
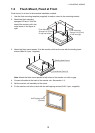
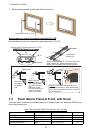
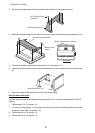
7. Set the masking panel to each side of the monitor unit.
How to attach or detach the masking panel for 19” LCD
Do the following to attach or detach the masking panel for 19” LCD.
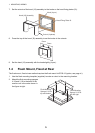
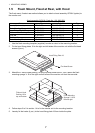
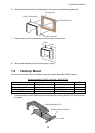
1.3 Flush Mount, Fixed at Front, with Hood
The flush mount, fixed at front method allows you to attach a hood (19) assembly OP26-24 (op-
tion) to the monitor unit.
Hood (19) assembly OP26-24 (Code No.: 001-139-370)
Name Type Code No. Qty
Hood (19) Assembly OP26-6-1 001-080-970 1
Knob M4 03-163-2303 100-343-602-10 4
Hood Fixing Plate (19) 26-007-1128 100-366-350-10 2
Binding Head Screw M3x8 000-172-166-10 6
Masking Panel for 19” LCD
Tab A
Tab B
Front side of
monitor unit
Set the masking panel for 19” LCD to each side
of the monitor unit. Attach each tab A to the
monitor unit. Be careful not to break the tabs.
Set tab B to
the edge of
the monitor
unit.
Monitor unit
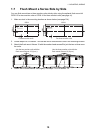
To attach, follow order of right arrow (→). To detach, follow order of left arrow (←).
Masking
panel
→→
←
←
1
2
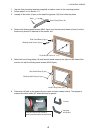
Reverse view of masking panel for 19” LCD
a
b
c
Attach: Push the
masking panel for 19”
LCD in the direction
, rotate the panel
toward the monitor
unit, then set each tab
A one by one (three
places of a, b and c) .
1
2
Detach: Push the masking panel for 19”
LCD in the direction 1, then release each
tab A one by one
(three places of a, b and c)
in the direction 2.