161 91.3
111
30˚
20
4
INSTALLATION
(IN-DASH MOUNTING)
The following illustration shows a typical installation. However, you
should make adjustments corresponding to your specific car. If you
have any questions or require information regarding installation kits,
consult your JVC IN-CAR ENTERTAINMENT dealer or a company
supplying kits.
• If you are not sure how to install this unit correctly, have it installed
by a qualified technician.
Before installing the unit
• When mounting the unit, be sure to use the screws provided, as
instructed. If other screws are used, parts could become loose or
damaged.
• When tightening screws or bolts, be careful not to pinch any
connection cord.
• Make sure not to block the fan on the rear to maintain proper
ventilation when installing the unit.
1 Remove the audio system originally installed in the car, together
with its mounting brackets.
Note: Be sure to keep all the screws and parts removed from
your car for future use.
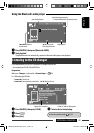
2 Install the sleeve in the dashboard of the car.
3 Attach the brackets to the main unit.
• Make sure to use the supplied flat head screws (M5 × 8 mm). If
longer screws are used, they could damage the unit.
4 Do the required electrical connections.
• See pages 3 – 6.
5 Install the main unit in the sleeve.
6 Attach the trim plate.
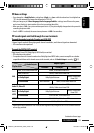
Install the unit at an angle of less than 30˚, taking it into account that the monitor would eject
when in use.
Installez l’appareil avec un angle de moins de 30°, en tenant compte du fait que le moniteur
doit être déployé lors de son utilisation.
Установите устройство под углом менее 30 °, принимая во внимание то,что при
использовании монитор будет выдвигаться.
Required space for installation and the monitor ejection
Espace nécessaire pour l’installation et l’éjection du moniteur
Необходимое пространство для установки и извлечения
монитора
Unit: mm
Unité: mm
Единицы измерения: мм
Round head screws (M2.6 × 3 mm)
Vis à tête ronde (M2,6 × 3 mm)
Болты с круглой головкой (M2,6 × 3 мм)
Trim plate
Plaque d’assemblage
Декоративную панель
Brackets
Supports
Декоративную панель
Flat head screws (M5
× 8 mm)
Vis à tête plate (M5
× 8 mm)
Болты с плоской головкой (M5
× 8 мм)
Sleeve
Manchon
Муфта
1
2
3
4
5
6
УСТАНОВКА (УСТАНОВКА В
ПРИБОРНУЮ ПАНЕЛЬ)
На следующих иллюстрациях показана типовая установка.
Однако необходимо выполнить настройки, соответствующие
конкретному автомобилю. Если у Вас есть какие-либо
вопросы, касающиеся установки, обратитесь к Вашему дилеру
автомобильных систем JVC или в компанию, поставляющую
соответствующие принадлежности.
• Если Вы не знаете точно, как следует устанавливать это
устройство, обратитесь к квалифицированному специалисту.
Предостережение во время установки
• При установке устройства используйте только прилагаемые
болты в соответствии с инструкцией. В случае использования
других болтов существует вероятность, что детали могут
быть ненадежно закреплены или повреждены.
• Аккуратно затягивайте болты,чтобы не пережать
соединительные кабели.
• При установке для обеспечения правильной вентиляции не
закрывайте вентилятор на задней панели.
1 Извлеките аудиосистему, изначально установленную в
автомобиле, вместе с монтажными кронштейнами.
Примечание: Не теряйте винты и детали, извлеченные
из автомобиля, поскольку они будут использоваться в
дальнейшем.
2 Вмонтируйте муфту в приборную панель автомобиля.
3 Прикрепите кронштейны к главному устройству.
• Используйте болты с плоской головкой (M5 × 8
мм),
которые входят в комплект поставки. При использовании
более длинных болтов можно повредить устройство.
4 Выполните необходимые электрические соединения.
• См. стр. 3 – 6.
5 Установите главное устройство в муфту.
6 Прикрепите декоративную панель.
INSTALLATION (MONTAGE DANS LE
TABLEAU DE BORD)
L’illustration suivante est un exemple d’installation typique.
Cependant, vous devez faire les ajustements correspondant à votre
voiture. Si vous avez des questions ou avez besoin d’information
sur des kits d’installation, consulter votre revendeur d’autoradios
JVC ou une compagnie d’approvisionnement.
• Si vous n’êtes pas sûr de pouvoir installer l’appareil correctement,
faite-le installer par un technicien qualifié.
Avant d’installer l’appareil
• Lors du montage de l’appareil, assurez-vous d’utiliser les vis
fournies, de la façon indiquée. Si vous utilisez d’autres vis,
certaines pièces peuvent être perdues ou endommagées.
• Lorsque vous serrez des vis ou des boulons, faites attention de ne
pas pincer un cordon de connexion.
• Assurez-vous de ne pas bloquer le ventilateur sur le panneau
arrière lors de l’installation afin de permettre une ventilation
correcte.
1 Retirez le système audio d’origine installé dans la voiture en
même temps que les supports de montage.
Remarque: Assurez-vous de conserver toutes les vis et pièces
détachées de votre voiture pour une utilisation dans le future.
2 Installez le manchon dans le tableau de bord de la voiture.
3 Attachez les supports à l’appareil principal.
• Assurez-vous d’utiliser les vis à tête plate fournis—
(M5 × 8 mm). Vous risquez d’endommager l’appareil si vous
utilisez des vis plus longues.
4 Réalisez les connexions électriques requises.
• Référez-vous aux pages 3 – 6.
5 Installez l’appareil principal dans le manchon.
6 Fixez la plaque d’assemblage.
Dashboard
Tableau de bord
Приборная панель
Install1_KW-AVX726_011A_f.indd 2Install1_KW-AVX726_011A_f.indd 2 2/4/09 2:42:57 PM2/4/09 2:42:57 PM