


13
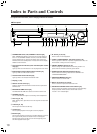
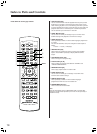
1 ON button [26, 32, 68]
Turns on the DVD Receiver.
2 MODE RECEIVER, MODE TV/SETUP buttons [15]
For switching the button functions.
3 STANDBY button [36, 45, 47, 64]
Put the DVD Receiver in standby.
4 INPUT SELECTOR 2/3 buttons [37, 39-41]
Press to select the input source.
5 +10/--/--- button [41, 83]
Press to input numbers over 10.
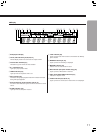
6 TOP MENU button [34, 54]
Press to call up the top menu programmed on the DVD. Depending
on the DVD, the top menu may be identical to the DVD menu.
7 Cursor (2/3/5/∞) [31, 32, 43-47, 58-61, 68, 81]
Use to move through the options on menu screens.
8 RETURN button [34, 68, 77, 79, 80]
Use to go one menu back (current settings are maintained). Use
RETURN when you do not want to change the option setting in a
menu.
9 REPEAT button [56]
Use to set the repeat mode.
0 A-B button [56]
Press at the beginning and end of the section you want to repeat or
to mark a location you want to return to.
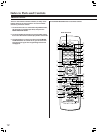
- 7 button [36]
Press to stop playback (DVD). Pressing once enables playback to
resume from a point shortly before the location where it was
stopped. Pressing twice causes the disc to return to the beginning
of the disc when playback starts again.
= 1/¡ buttons [35, 37]
During playback of DVD and Video CD, press ¡ to perform fast
forward scanning or 1 to perform fast reverse scanning of DVD
and Video CD. When a CD or MP3 is loaded, audio scanning is
performed. When AM or FM is selected, press for tuning.
~ MODE button [37, 41]
For FM input, press to switch between FM Stereo auto and mono.
For MD or CD Recorder input, press to select play mode (Random
or Memory).
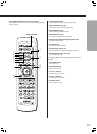
! MD/CDR/TAPE buttons [41]
Press to operate Onkyo MD Recorder, CD Recorder or Tape Deck.
™/8 : Press to pause playback of a disc or to reverse playback of
a cassette tape.
7: Press to stop playback.
£: Press to start playback.
@ SLEEP button [44]
For setting the sleep timer.
# MUTING button [42]
Activates the mute function.
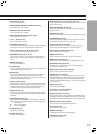
$ Number buttons (1-9, +10, 0) [31, 53, 58-61, 83]
Use to perform direct title/folder and chapter/track searches, and to
input numerical values.
% ACOUSTIC CONTROL button [53]
Press to change the acoustic mode to boost the super bass/high
frequency sounds.
^ SEARCH button [54]
Press to perform a title/folder, chapter/track or elapsed time search.
& PROGRAM button [58-61]
You can program titles, chapters or tracks to play back in desired
order. Programs can be a maximum of 24 steps.
* CLEAR button [55, 56, 61, 63-65]
Works in conjunction with a number of player functions. Use to
cancel repeat and random playback, and to edit programs.
( SHIFT button [14, 50, 51, 53, 62-65, 81]
Press to switch the button function.
) TIMER button [43-47]
Press to activate a timer function or to set a timer program.
_ MENU button [34, 55, 63, 65]
Use to display or close the DVD menu or MP3 Navigator screen.
+ DVD SETUP button [32, 68, 81]
Press when the DVD Receiver is in either play or stop mode to
open and close the Setup screen.
¡ ENTER button [31, 32, 43-47, 58-62, 81]
Press to choose a selected item or function.
™ STEP/SLOW +/– buttons [57]
Press STEP/SLOW +/– during playback to view still frame. Press
and hold STEP/SLOW +/– during playback to view slow playback.
In still frame, press STEP/SLOW + to advance DVDs and Video
CDs frame by frame and STEP/SLOW – to back up a few frames at
a time (DVD only).
£ 8 button [31, 34, 57]
Press to pause disc playback.
¢ £ button [31, 34, 36, 54, 56-60, 62]
Press to start or resume playback.
∞ 4/¢ buttons [35, 37, 39, 62]
During playback of DVD, CD and Video CD, press 4 to go back
to a previous chapter/track and ¢ to advance to the next chapter/
track. When AM or FM is selected, press to select preset channels.
§ DISPLAY button [29, 38, 43, 65, 66]
Press to change the information being displayed.
¶ CLOCK button [43]
Press to view the clock display.
• DIMMER button [42]
For adjusting the brightness of the front display.
ª VOLUME 5/∞ buttons [42]
For adjusting the volume.