


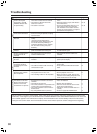


Causes
• The power cord is disconnected.
• The power cord has slipped out of the
unit's AC INLET.
• There is external noise interfering with the
computer circuits of the DVD Receiver.
• The muting function is activated.
• The DVD Receiver is not properly
connected.
• The amplifier protection circuitry has
activated. (The STANDBY indicator
flashes.)
• Headphones are connected.
• The volume is low.
• The speakers are not properly connected.
• The listening mode is set to “STEREO” or
“ORCHESTRA.”
• The volume level of the center speaker
(“CENTER”) is set to minimum.
• A speaker configuration without the center
speaker is selected.
• The TV is not set to receive the output
signals from the DVD Receiver.
• The video connection cable is not
connected securely.
• Another input source is selected.
• Power supply fluctuations or other
abnormalities such as static electricity
may interrupt correct operation.
• The disc is not placed properly on the disc
tray.
• The disc is dirty or warped.
• Region number does not conform with
this unit.
• No disc is inserted.
• An unplayable disc is inserted.
• The disc is placed upside down.
• The disc is not placed within the disc tray
guide.
• The disc is dirty.
• The parental lock function is activated.
• The disc is dirty.
• It is in fast forward or fast reverse
playback.
• Copy protection is activated.
• The TV is not set to receive the output
signals from the DVD Receiver.
• The DVD Receiver is not properly
connected.
• When the power is turned off by power
failure or by unplugging the power cord,
settings will be canceled.
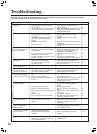
Remedies
• Check the connection of the power cord.
• Firmly connect the power cord to the
unit's AC INLET.
• Switch off the STANDBY/ON then switch it on
again. If not recovered, disconnect the power
cord, then connect it again.
• Deactivate the muting function.
• Check the connections to the DVD
Receiver.
• Contact your nearest Onkyo service
center.
• Decrease the volume, then disconnect the
headphones.
• Use the MASTER VOLUME to turn up the
volume.
• Check the speaker connections.
• No sound is reproduced from the center
speaker when the listening mode is
“STEREO” or “ORCHESTRA.”
• Adjust the volume level of the center
speaker.
• Check that the selected speaker
configuration includes the center speaker.
• Set the TV to the DVD Receiver’s input.
Refer to the instruction manual of TV.
• Check the connections between the DVD
Receiver and TV set.
• Select the appropriate input source.
• Switch off the STANDBY/ON, then switch it
on again. If not recovered, disconnect the
power cord then connect it again.
• Use the disc tray guide to align the disc.
• Refer to “Notes on Discs”.
• If the region number on the disc does not
match the number on the DVD receiver,
the disc cannot be used.
• Insert a disc. (Check that “DVD,” “VCD,”
or “CD” is lit in the DVD Receiver’s
display.)
• Check the playable discs.
• Place the disc with the playback side
down.
• Place the disc within the proper guide on
the disc tray.
• Eject the disc and clean it.
• Deactivate the parental lock function or
change the parental lock level.
• Eject the disc and clean it.
• Sometimes a small amount of picture
distortion may appear. This is not a
malfunction.
• Connect the DVD Receiver directly to the
TV. Avoid connecting the DVD Receiver to
the TV through a VCR.
• Set the TV to the DVD Receiver’s input.
• Check the connections to the DVD
Receiver.
• Before unplugging the power cord, press
STANDBY/ON.
Symptoms
The DVD Receiver doesn’t
switch on.
No sound is reproduced.
No sound or very little
sound is reproduced from
the center speaker.
No picture appears on the
TV screen.
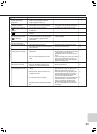
The sound of the playback
source is not heard.
The buttons on the remote
controller and DVD
Receiver do not operate.
The disc tray comes back
out automatically, shortly
after the disc tray is closed.
The DVD Receiver does
not start playback.
The playback picture is
occasionally distorted.
Brightness is unstable or
noise is visible on the
playback picture.
The picture from the DVD
Receiver doesn’t appear
on the TV screen.
Settings are canceled.
Check the following guide for the possible cause of a problem before contacting service. Refer also to the respective
instruction manuals of the connected components and TV.
Pages
26
26
26
42
18-25
—
42
42
20
48, 51
30
28
—
18, 19
40
26
33
8, 9
4
33
8
33
33
9
79
9
—
18, 19
—
18, 19
—
Amplifier
DVD (VIDEO CD/Audio CD)
Troubleshooting
84