


40
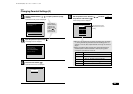
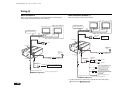
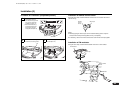
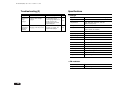
Other connection (Example 2)
Adding a digital amplifier or an amplifier with Dolby digital decoder.
Notes:
¡Read the manuals supplied with the digital amplifier or the amplifier with Dolby
digital decoder as well as this manual.
¡When you add an amplifier with Dolby digital decoder, select “Bitstream” in “Digital
Output” on the Setup. zSee page 29,“Changing the Digital Output”.
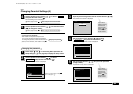
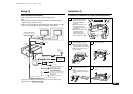
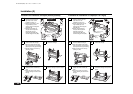
Procedure for installation on carpet (Horizontal position)
Wiring (3) Installation (1)
1
2 3
4 5
¡Confirm that the built-in anti-
vibration boards on both the
left and right sides are set to
the horizontal installation
position “H”.
¡Attach Small bracket (L) and
Small bracket (R) to the
changer using the hexagonal
bolts (M5 x 8).
¡Attach Small brackets (L) and
(R) to their respective
brackets (B) using the
hexagonal bolts (M6 x 20)
and the hexagonal nuts (M6).
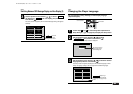
¡Pull back the carpet and determine
where to attach the changer.
¡Stick the supplied double-sided
tape to the bottom of the brackets
(B) and peel off the paper backing.
¡Affix the changer to the floor by
pressing in place.
¡Using a knife, cut “X”s in the carpet
directly above the brackets (B)
bolts.
¡Return the carpet to its original
position allowing the bolts to stick
through.
¡Once more, use the hexagonal nuts
to attach the changer on top of the
carpet.
¡Remove the hexagonal nuts and
take off the changer.
H
V
45°
H
V
45°
H
V
45°
H
V
45°
Hexagonal bolts
(M6 x 20)
Hexagonal
bolts
(M5 x 8)
Built-in anti-vibration
board position
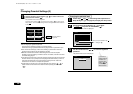
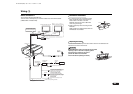
R
Attached DIN
cable (8 pin, 5 m)
Attached parking brake cable
Connect to car’s parking brake line.
Bright green
Red
White
Not used.
Yellow
(Rear)
Changer unit
Yellow
(Front)
Monitor with Video input jack Monitor with Video input jack
To video input
(Yellow)
To video input
(Yellow)
* You can add a monitor for rear seats.
Attached
Remote control
sensor
R
L
Attached FM
modulator
Commercially
available optical
cable
+12 volt Accessory/Switched (red)
Connect to where the power is
supplied when the ACC power or
ignition switch is turned ON.
+12 volt Constant (yellow)
Connect this lead to the cable to
which power is continuously supplied
and which has been passed through
the car’s fuse unit.
Ground (black)
Screw this to a metal part of the
car.
Fuse 5A
Not used.
Not used.
To digital
audio input
Bright green
Digital amplifier/
Amplifier with Dolby
digital decoder
If not long enough, use the
extension cable included.
* If a fuse becomes blown, replace it with a fuse with the correct rated capacity.
zSee page 38, “ Replacing the fuses ”.
DV-S100/ZA(GB) 03.11.28 1:19 PM ページ40