


9-EN
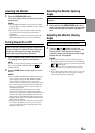
Lowering the Monitor
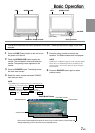
1 Press the OPEN/CLOSE button.
The unit will beep 3 times and lower the monitor
automatically.
NOTES
• The IVA-C801/CVA-1006 is a precision device. With
gentle handling, its unique capabilities can be enjoyed
for a long time.
• If the monitor touches an obstacle while it is being
lowered, the unit will stop lowering the monitor
immediately.
Should this occur, remove the obstacle and press the
OPEN/CLOSE button again to lower the monitor.
Turning Power On or Off
Some of this unit's functions, cannot be performed
while the vehicle is in motion. Be sure to stop your
vehicle in a safe location and apply the parking
brake, before attempting these operations.
1 Press the PWR (Power) button to turn on the unit.
The opening screen appears automatically.
NOTE
The unit can be turned on by pressing any button on the
unit except the MUTE, OPEN/CLOSE and
(ANGLE) buttons.
2 Press the PWR (Power) button again to turn off
the unit.
NOTES
• The IVA-C801/CVA-1006 draws minimal current even
when its power switch is turned off. If the switched
power (ignition) lead of the IVA-C801/CVA-1006 is
connected directly to the positive (+) post of the
vehicle's battery, the battery may be discharged. If this
lead is unswitched, it must be disconnected from the
battery post should the vehicle be left unused for an
extended period of time.
An SPST (Single-Pole, Single-Throw) switch (sold
separately) can be added to simplify this procedure.
Then, you can simply place it in the OFF position when
you leave the vehicle. Turn the SPST switch back ON
before using the IVA-C801/CVA-1006. For connecting
the SPST switch, refer to the "Connection Diagram of
SPST switch" on page 61.
• Some operation of the unit cannot be performed while
the vehicle is in motion. In this case, be sure to first
stop your vehicle and apply the parking brake, then
perform the operation.
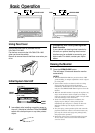
Selecting the Monitor Opening
Angle
The monitor opening angle can be set in 2
positions.
1 Press and hold the OPEN/CLOSE button for at
least 2 seconds while the monitor is being raised.
Each press changes the monitor angle back or
forth.
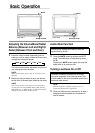
Adjusting the Monitor Viewing
Angle
Adjust the monitor's angle for better visibility.
1 Press the and buttons to adjust the
monitor's angle so the screen will be in the best
viewing position. Each press of the buttons
produces a beep and changes the screen angle
between 80 and 104 degrees.
NOTES
• If the monitor touches an obstacle while the angle is
being adjusted the unit will stop the screen immediately.
Should this happen, remove the obstacle and press the
or button again.
• The screen color will vary when viewed at certain
angles. Adjust the screen angle for the best viewing
position.
• If the voltage of the vehicle's battery power is low, the
screen may blink when the screen angle is changed.
This is normal and not a malfunction.