


Quick Installation
D6600
1. Place the D6600 in a secure location.
2. Remove the tie wrap from the receiver door handle. Open the door and remove the
packaging foam from the front of the CPU Card.
3. Gently push the CPU and line cards into their slots until they connect securely.
4. Ensure that the D6600 power switch is in the OFF position.
5. Plug the AC power cord into the rear of the D6600.
6. Plug the other end into an unswitched 100 to 120 VAC (or 220 to 230 VAC), 50 to 60 Hz
line.
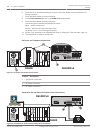
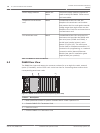
7. Refer to the figure AC Power and Telephone Connections, page 12. Plug the telephone
lines into the connectors on the first line terminator card.
8. If you need a network automation connection, skip this step and continue with the
remainder of the installation. For additional instructions on connecting automation
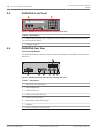
software to the network, refer to Network Communications, page 42. Refer to the figure
Automation PC and External Parallel Printer Connections, page 12. Connect the
automation computer (callout 1) to COM3 the center DB-9 connector on the CPU
terminator card, using a null-modem cable (callout 2).
9. Refer to the figure Automation PC and External Parallel Printer Connections, page 12.
Connect an external parallel printer, with the power off (callout 4), to the lower 25-pin
connector on the CPU terminator card (callout 5).
10. Turn the power switch on the D6600 to the ON position.
11. Press the UP button to increase display contract. Press the Down button to decrease
display contrast.
12. Press the Menu button to enter the menu.
13. On the Enter Password screen, type 6600 (default password).
14. Press the Enter button to enter the menu.
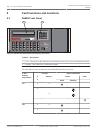
Use these keys to operate the D6600 menus:
Enter – Enter a menu level
Cancel– Return to the previous menu level
UP/Down arrow – Scroll through the menus
15. Set the Time and Date on the D6600 (refer to Setting the Time and Date, page 13).
16. The D6600 is ready to accept calls.
D6100IPv6
1. Place the D6100IPv6 in a secure location (such as a rack mount or desktop).
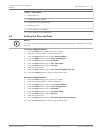
2. Refer to the figure AC Power and Telephone Connections, page 12. Plug telephone lines
into the connectors on the back of the D6100IPv6.
3. If you need a network automation connection, skip this step and continue with the
remainder of the installation. For additional instructions on connecting automation
software to the network, refer to Network Communications, page 42. Refer to the figure
Automation PC and External Parallel Printer Connections, page 12. Connect the
automation computer (callout 1) to COM3, the DB-9 connector using a null-modem cable
(callout 2).
4. Refer to the figure Automation PC and External Parallel Printer Connections, page 12.
Connect an external parallel printer (callout 4), with the power off, to the 25-pin
connector (callout 6).
5. Connect the transformer leads to the 18 VAC terminals and plug the other end into the
power source.
4
Conettix Communications Receiver/
Gateway
Quick Installation | en 11
Bosch Security Systems, Inc. Installation and Operation Guide 2012.11 | 08 | 4998122704