


VRX610 2928 VRX610
Rear Vision Camera
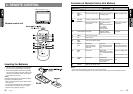
Monitoring the rear vision camera
The rear vision camera can be connected to this
unit. For the power supply of the camera, mount
the power box sold separately (CAA-147).
Notes:
• This function is not available when the display is
stored.
TV Operations
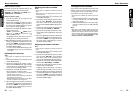
Adjusting the brightness and tone
of color
Notes:
• This operation is available only when the car is
stopped and the parking brake is applied.
• This function is not available when the display is
stored.
• The HUE setting can be adjusted only when the
NTSC mode is selected.
1. Press the ADJ button * to switch to the ad-
justment selection display.
2. Operate the JOYSTICK ¡ upward or down-
ward to select the option “MONI ADJ” (by
moving the cursor).
3. Press the ENT at the center of the JOYSTICK
¡.
4. Operate the JOYSTICK ¡ rightward or left-
ward to select “BRIGHT”,“COLOR” or “HUE”
(by moving the cursor).
● “BRIGHT“:
Adjust the brightness of the display.
● “COLOR“:
Adjusts the color saturation.
● “HUE“:
Adjusts the tone of color (red is emphasized
or green is emphasized.)
5. Operate the JOYSTICK ¡ upward or down-
ward to adjust a level.
6. When the adjustment is made, operate the
JOYSTICK ¡ rightward or leftward to move
the cursor to “MENU”. Then press the ENT at
the center of the JOYSTICK ¡ to return to
the adjustment selection display.
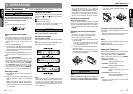
Changing over TV display size
∗ This function is available only when the panel is
open.
Press the WIDE button 7 to change over the
TV display size. Each time you press the
WIDE button 7, the TV display size changes
in the following order:
“NORMAL” ➜ “WIDE” ➜ “F. WIDE” ➜ “CIN-
EMA” ➜ “NORMAL”
● “NORMAL”: (normal display)
There is a black area at both right and left
ends of a display. In case of normal TV broad-
casting (4:3), the image can be shown with-
out being cut or deformed.
● “WIDE”: (wide mode)
The image at right and left ends in a display
elongates horizontally.
● “F. WIDE”: (full wide mode)
The whole image elongates horizontally.
● “CINEMA”: (cinema mode)
The image at both top and bottom in a dis-
play disappears.
Notes:
• When a normal 4:3 size image, not being a wide
one, is viewed by displaying it fully on a wide TV
display in a wide mode or a full-wide mode, a part
of the peripheral image will be lacking or deformed.
In deference to the intention of producer, an origi-
nal image can be viewed in a normal mode.
• During superimposed display, it becomes a full-
wide mode.
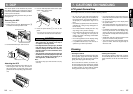
Operation of External Visual
Devices (VISUAL Mode)
External visual devices such as DVD and VTR
devices can be connected to the DIN 8-pin ter-
minal, and the image and sound can then be
played using VISUAL mode.
Notes:
• While driving, the image of the VISUAL Mode is
turned OFF and only sound is played.
• Images can only be played when the vehicle is
stationary with the parking brake ON.
1. With the panel open, push VISUAL button )
to switch from radio, TV, CD/MD changer
mode to VISUAL mode.
2. To exit VISUAL Mode and return to the previ-
ous mode, press VISUAL button ) again.
∗ The image format played in VISUAL mode can
be set to NTSC or PAL format. The setting
method is the same as for the TV. Please refer
to the TV explanation.
∗ In VISUAL mode, the picture quality can be ad-
justed. The setting method is the same as for
the TV. Please refer to the TV explanation.
Switching to Composite
Screen
∗ The display panel can be switched to a composite
screen to lock the monitor or to view a video CD.
1. When the panel is open, press the OPEN/
M.LOCK button ! to switch to the compos-
ite screen.
2. When the panel is open and the composite screen
is shown, press the OPEN/M.LOCK button
! again to return to the previous screen.