


VRX610 4948 VRX610
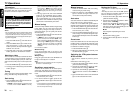
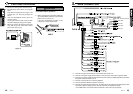
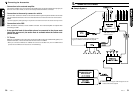
∗ 1: Connect securely to the metal part of the vehicle with a screw, etc.
∗ 2: Connect to the power supply terminal which can be turned on and off by the ignition switch.
∗ 3: Connect to the power supply terminal where the power is always supplied regardless of whether
the ignition switch is turned on or off.
∗ 4: Connect to the remote turn-on lead of amplifiers.
∗ 5: Use the attached extension lead when necessary.
∗ 6: Connect the terminal to the lead wire on the lamp side of the parking brake lamp switch. After
connection, apply the parking brake, then check that the TV displays an image.
• If the PKB lead is not connected to the side brake, some units may not operate.
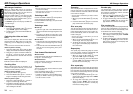
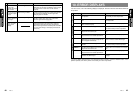
8. WIRE CONNECTION
AUDIO 4CH. OUTPUT terminal
Front right
Front left
Rear right
Rear left
Red
Red
White
White
Gray
Brack
Gray
Brack
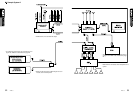
1. Be sure to turn the power off before wiring.
2. Be particularly careful where you route the
wires.
Keep them well away from the engine, and
exhaust pipe, etc. Heat may damage the
wires.
3. If the fuse should blow, check to see if the
wiring is correct.
If it is, replace the fuse with a new one with
the same amperage rating as the original.
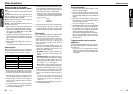
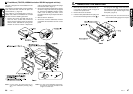
4. When any fuse is to be replaced, pull out the
fuse (15A) at the rear of the main unit and
put in a new one (Fig.10).
5. When connecting the ground lead, fasten the
ground lead (black) securely to a clean metal
plate on the car. (Figure 11)
If the set is insufficiently grounded, it may
not operate or there may be noise.
After the connection, fix the lead by a clamp
or insulation tape for protection.
7. CAUTIONS ON WIRING
CAUTION
Figure 10