


3-8 C1510M-A (2/03) SECTION 3
In the 9760 keyboard:
3. Finally, the programmed logical number (100) associated with the System Alarm
number (in our example, 1) is used to ARM the alarm on the 9760 SIDE. This is
done from the 9760 keyboard via its program menus or, if desired, it can be
accomplished through automatic configuration via macro execution when the
keyboard user logs onto the system.
To accomplish this task direct from the 9760 keyboard, perform the following
steps:
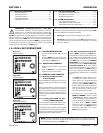
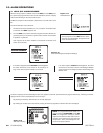
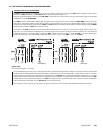
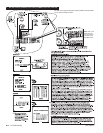
a. After logging onto the system from the keyboard, press the key to
proceed to the DEFAULT MENU (see Figure 3-20).
b. Enter the logical number of the alarm you want to ARM in the keypad and
press the blue button below the ALARM icon as indicated in Figure 3-20.
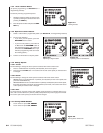
c. The ALARM SUB-MENU appears. Activate the indicated icon in Figure 3-
21 to ARM the alarm. If you have not previously entered a PIN number for
the DEF menu, the display in Figure 3-22 appears. Enter the default PIN of
1234. The display will revert back to Figure 3-21. Press the blue button to
activate the ARM function. The ARM DIS’ icon turns opaque as in Figure 3-
23. This completes ARMing the alarm for Physical Alarm 1.
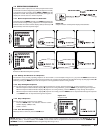
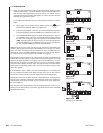
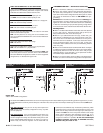
Additional alarms may be armed from this menu by entering the associated logical
number in the keypad and pressing the ALARM (bell) icon. This takes you back to
Figure 3-21, which now displays the new number in the menu; the ARM DIS’ icon is
clear and can now be activated to ARM the next alarm. The result is again Figure 3-
23, except that now, the new numbers for the ARMed alarm appear.
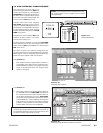
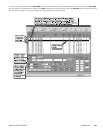
Once the above equipment menus are configured and an alarm is received from the
CM9760-SAT, the alarm display in Figure 3-24 is activated and appears on the LCD
display of the 9760 keyboard (if you happen to be in the ALARM menu). If not, the
alarm bell icon still appears no matter what menu you are in. The bell icon flashes,
going from clear to opaque and back again. The logical number associated with the
alarm appears on the display and the alarm camera number called in response to the
alarm, also appears.
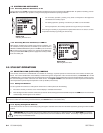
If, as referenced in step 2’s “NOTE” (automatic acknowledgment is not enabled), then
you can navigate to the Alarm menu shown in Figure 3-24, and can then reset the
alarm shown, pause the alarm or reset all alarms (if there are multiple alarms).
Resetting the alarm does not disarm the alarm. That must be done separately, if that’s
what you want. Otherwise, resetting the alarm allows the system to be ready for the
next activation of this alarm, which will not occur until the source of this alarm activa-
tion is corrected first.
More extensive alarm programming functions associated with the system are pos-
sible but are not discussed here. Consult the appropriate sections of the 9760-MGR
and 9760-KBD manuals.
▼
▼
▼
Figure 3-20
Default Menu
Figure 3-21
Alarm Sub-Menu
Figure 3-22
DEF PIN Menu
Figure 3-23
Armed Alarm
Figure 3-24
Operator Alarm Notification