


22
En
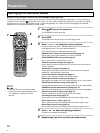
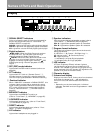
Names of Parts and Basic Operations
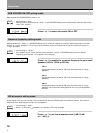
0 Speaker indicators
Light to indicate the current speaker system (refer to
“Front Panel”, 5, SPEAKERS (A/B) on page 24).
SP 3 A : Lights when speaker system A is selected.
SP 3 B : Lights when speaker system B is selected.
- Program format indicators
The following indicators light to show the channels
being played back.
L : Left front*
1
*
2
, C : Center*
1
, R : Right front*
1
*
2
,
LS : Left surround*
1
, S : Surround (mono)*
2
,
RS : Right surround*
1
*1: Indicates 5.1ch Dolby Digital playback.
*2: Indicates Dolby Pro Logic playback.
= LFE indicator
LFE (Low Frequency Effects) indicator lights to
indicate that the program source contains an LFE
channel. The indicator to the left of LFE lights during
actual playback of the LFE signals (LFE signals are not
present in all parts of the sound track).
~ Character display
! Volume level display
Displays the volume level. Volume level is maintained
even when the power is off. ---dB indicates the
minimum level, and 0dB indicates the maximum
level.
• Depending on the level settings for individual
channels, the MAX level can range between –10dB
and 0dB.
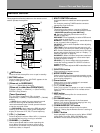
1 SIGNAL SELECT indicators
Light to indicate the type of input signal selected for
the current component (refer to “Front Panel”, =,
SIGNAL SELECT on page 24).
ANALOG : Lights when the analog audio signals are selected.
DIGITAL : Lights when the digital audio signals are selected.
AC-3 : Lights when a source with Dolby Digital signals is played.
2 Digital indicators
PRO LOGIC :
When the Dolby Surround mode on
the amplifier is on,
this indicator lights during 2
channel playback of Dolby Digital sources.
DIGITAL :
When the Dolby Surround mode on the
amplifier is on, this indicator lights to indicate
playback of a Dolby Digital signal. However, PRO
LOGIC lights during 2 channel playback of Dolby
Digital.
3 SFC (DSP) mode indicator
Lights when the DSP mode is selected (refer to on
page 26).
4 ATT indicator
Lights when ATT (refer to “Remote Control”, 7,
Number buttons on page 23) is used to reduce the
level of the input signal (available in ANALOG mode only).
5 Overload indicator
When “ANALOG” is selected in SIGNAL SELECT, this
indicator lights to show that an excessively strong
signal is being processed. When this occurs, press
ATT on the remote control to attenuate the signal
(refer to “Remote Control”, 7, Number button on
page 23).
6 MIDNIGHT indicator
Lights when the MIDNIGHT mode is on.
(refer to “Front Panel”,! , MIDNIGHT on page 25).
7 LOUDNESS indicator
Lights when loudness is on. (refer to “Front Panel”,
9, LOUDNESS on page 24).
8 DIRECT indicator
Lights when direct playback is on (refer to “Front
Panel”, ^, DIRECT on page 25).
9 H.P indicator
Lights when headphones are plugged in.
Display
dB
SP
SIGNAL
SELECT
ANALOG
DIGITAL
AC-3
PRO LOGIC
AB
DIGITAL
LCR
RSSLS
LFE
SFC
ATT MIDNIGHT LOUDNESS
H.P
DIRECT
123456
7
0
!
8
9
=
-
~