


24
En
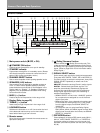
Names of Parts and Basic Operations
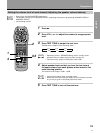
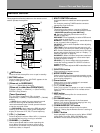
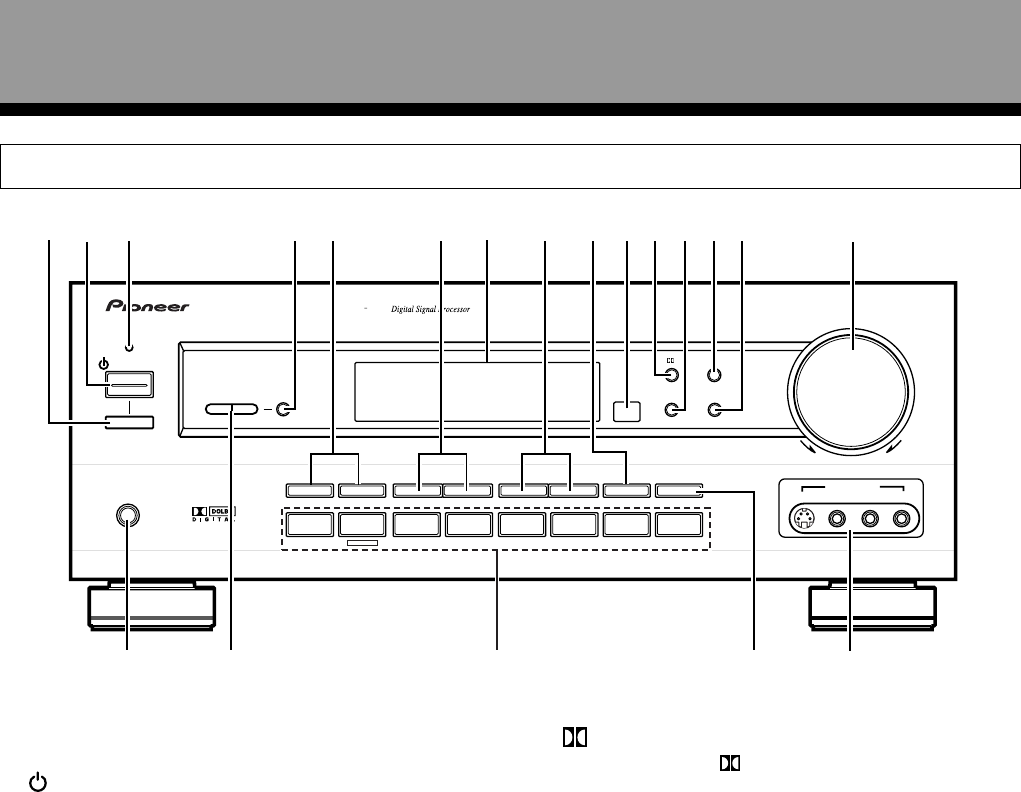
Front Panel
1 Main power switch (— OFF, _ ON)
2
STANDBY/ON button
Press to switch the amplifier on or put in standby.
3 STANDBY indicator
Lights when the amplifier is in standby mode. (Please
note that this amplifier consumes a small amount of
power (2 W) during the standby mode.)
4 CHANNEL SELECT button
Use to select a speaker when ajusting speaker levels.
5 SPEAKERS (A/B) buttons
Use to switch the corresponding speaker system on
or off. To listen to both speaker systems (A and B),
press the buttons so that both A and B appear in the
display (refer to “Display”, 0, Speaker indicators on
page 22). Only A speakers are available when using
surround sound modes.
6 BASS (–/+) button
Press to adjust low frequencies in the range of ±6.
7 Display (Refer to page 22)
8 TREBLE (–/+) button
Used to adjust high frequencies in the range of ±6.
9 LOUDNESS button
Switches the loudness on or off. Use to raise the level
of the bass and treble so they can be more easily
heard when listening at low volumes.
0 Remote sensor
Point the remote control toward the remote sensor to
operate the amplifier.
- (Dolby) Surround button
Press to select the (Dolby) Surround mode. This
mode automatically switches between Dolby Digital
and Dolby Pro Logic decoding according to the input
signal. (Refer to page 29 for more information about
Dolby Digital.)
= SIGNAL SELECT button
Use to select input signals for the digital components.
First press VCR, DVD/LD, TV/SAT, CD or MD/TAPE (%,
Function buttons) to select the component, then press
SIGNAL SELECT repeatedly to select one of the
following:
ANALOG : Selects the analog (R and L) audio signals.
DIGITAL : Selects the digital audio signals. This
amplifier automatically detects and displays the
format of the signal being input. AC-3 lights when
Dolby Digital signals are input. (AC-3 decoding is
switched automatically.)
• SIGNAL SELECT is fixed in the “ANALOG” position
for components not assigned to one of the three
digital input jacks.
• Because the audio from a karaoke microphone and
LD recorded with analog audio only is not output
from the digital output, set SIGNAL SELECT to
“ANALOG”.
• This amplifier can only play back Dolby Digital,
PCM (32kHz, 44kHz, and 48kHz) signal formats. With
digital signal formats other than these, set SIGNAL
SELECT to “ANALOG”.
~ DSP MODE button
Press repeatedly to select a DSP sound mode (HALL 1,
HALL 2, JAZZ, DANCE, THEATER 1, or THEATER 2).
Use these modes to produce surround sound from
standard (two channel) stereo sources (refer to page
26, 30).
–
OFF
-
ON
STANDBY/ON
STANDBY
PHONES
AUDIO/VIDEO MULTI-CHANNEL AMPLIFIER
CHANNEL
LEVEL
CHANNEL
SELECT
SIGNAL
SELECT
MIDNIGHT
DOWN UP
BASS TREBLE
VCR DVD/LD VIDEOTV/SAT TUNER
CD
MD/TAPE AUX
LOUDNESS
DIRECT
VIDEO INPUT
VIDEO
S-VIDEO
L
MASTER
VOLUME
+
–
+
–
+
–
DSP
MODE
AUDIO
R
SPEAKERS
DVD 5.1CH
N∫z¿x?≤
A B
6
7
8
9
0
-=
~
!
@
#
$
%
^
2
3
4
5
1
&