


14
15
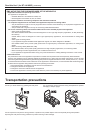
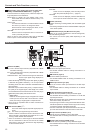
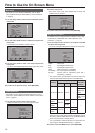
Detaching and Attaching the Tilt Stand
The tilt stand is detachable.
• When detaching and attaching the tilt stand, it is recommended that you place the unit flat on the edge of a desk or table with a soft
cloth or similar material spread underneath.
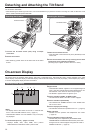
Detaching the tilt stand
①
②
Tilt stand screws
1. Unscrew the tilt stand screws (four) using a Phillips
screwdriver.
2. Detach the tilt stand.
• After detaching, please store the tilt stand and the tilt stand
screws.
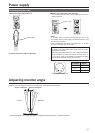
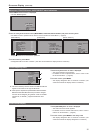
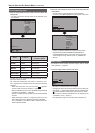
Attaching the tilt stand
①
②
A
Tilt stand screws
Plate
1. Attach the tilt stand to the unit.
• Insert the plate of the tilt stand into part A (illustrated) of the
monitor unit.
2. Screw the tilt stand to the unit by screwing the tilt stand
screws (four) using a Phillips screwdriver.
(Screwing torque: Tighten to about 100 N cm or more)
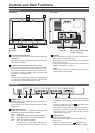
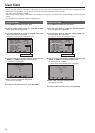
On-screen Display
The screen shows the operation status display, main menu, FUNCTION menu, INPUT SELECT menu, Picture adjusting menu, audio
volume display, sharpness display, FUNCTION display, audio level meter display, time code (TC) display, closed caption (CC) display,
in monitor display(IMD) display and other information.
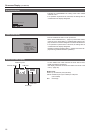
Operating status display
4
1 2 5 6 7
3
P-P FILM
SDI1 1080/60i
<Note>
• The display state of the status can be set in “STATUS DIS-
PLAY” of the “SYSTEM CONFIG” menu (→page 27).
• “UNSUPPORT SIGNAL” and “NO SIGNAL” may not be prop-
erly displayed.
1. The selected input line (→pages 11 and 18)
• Displays VIDEO, SDI1, SDI2, HDMI, DVI-I (YP
BPR/
RGB-COMP./DVI-VIDEO/DVI-COMP.) and INT-SG.
2. Signal format
• “UNSUPPORT SIGNAL” appears if an unsupported signal is
input. It may also indicate that the format selected in the “IN-
PUT SELECT” menu does not match the input signal.
• “NO SIGNAL” appears when no signal is input.
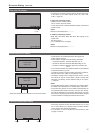
3. Various indications (PIXEL TO PIXEL mode)
• This indicates the PIXEL TO PIXEL mode is engaged.
4. Various indications (FILM mode)
• This indicates that “GAMMA SELECT” of the “VIDEO CON-
FIG” is set to “FILM.”
5. Various displays (lock setting)
• This indicates that the front operations lock is on. (→page 41)
6. Mute indication
• Indicates that the speaker and headphones are muted.
(→page 19)
7. Picture adjustment change indication
• Indicates that picture adjustments (PEAKING/PHASE/
CHROMA/BRIGHT/CONTRAST/BACKLIGHT) have been
changed from the values assigned using SETUP LOAD or
POWER ON SETUP. (→page 19)