


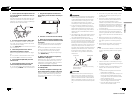
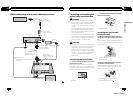

2 Fix the optional microphone in the cen-
ter of the headrest of the driver’s seat, fa-
cing forward.
The auto TA and EQ may differ depending on
where you place the microphone. If desired,
place the microphone on the front passenger
seat to perform auto TA and EQ.
3 Turn the ignition switch to ON or ACC.
If the air conditioner or heater is turned on,
turn it off. The noise from the fan may cause
incorrect auto TA and EQ.
# Press S(SRC/OFF) to turn the source on if this
unit is turned off.
4 Select the position for the seat on
which the microphone is placed.
Refer to Using the position selector on page
34.
# If no position is selected before auto TA and
EQ is started, F/L is automatically selected.
5 Press and hold S (SRC/OFF) until the
unit turns off.
6 Press and hold 1/S.Rtrv to enter the
auto TA and EQ measurement mode.
# You can also perform this operation by press-
ing and holding A.MENU on the remote control.
7 Plug the microphone into the micro-
phone input jack on the multi-channel pro-
cessor.
8 Press M.C. to start the auto TA and EQ.
9 When the 10-second countdown starts,
get out of the car and close the door within
10 seconds.
The measurement tone (noise) is outputted
from the speakers, and auto TA and EQ be-
gins.
# When all speakers are connected, auto TA
and EQ is completed in about nine minutes.
# To stop auto TA and EQ, press any keys.
# To cancel auto TA and EQ part way through,
press B(BAND/ESC).
10 When auto TA and EQ is completed,
COMPLETE is displayed.
When the car’s interior acoustic characteris-
tics cannot be measured correctly, an error
message will be displayed. (Refer to Auto TA
and EQ error messages on page 59.)
11 Press B (BAND/ESC) to cancel the auto
TA and EQ mode.
12 Store the microphone carefully in the
glove compartment or another safe place.
If the microphone is subjected to direct sun-
light for an extended period, high tempera-
tures may cause distortion, color change or
malfunction.
En
42
Section
03
Available accessories
WARNING
! To avoid the risk of accident and the potential
violation of applicable laws, the front DVD or
TV (sold separately) feature should never be
used while the vehicle is being driven. Also,
rear displays should not be in a location
where they are visibly distracting to the driver.
! In some countries or states the viewing of
images on a display inside a vehicle even by
persons other than the driver may be illegal.
Where such regulations apply, they must be
obeyed and this unit’s DVD features should
not be used.
! Use speakers over 50 W (output value) and be-
tween 4 W to 8 W (impedance value). Do not
use 1 W to 3 W speakers for this unit.
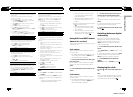
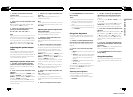
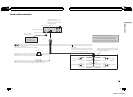
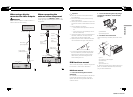
! The black cable is ground. When installing
this unit or power amp (sold separately), make
sure to connect the ground wire first. Ensure
that the ground wire is properly connected to
metal parts of the car’s body. The ground wire
of the power amp and the one of this unit or
any other device must be connected to the car
separately with different screws. If the screw
for the ground wire loosens or falls out, it
could result in fire, generation of smoke or
malfunction.
Ground wire
Metal parts of car’s body
POWER AMP
Other devices
(Another electronic
device in the car)
CAUTION
! PIONEER does not recommend that you in-
stall or service your display unit yourself. In-
stalling or servicing the product may expose
you to risk of electric shock or other hazards.
Refer all installation and servicing of your dis-
play unit to authorized Pioneer service person-
nel.
! Secure all wiring with cable clamps or electri-
cal tape. Do not allow any bare wiring to re-
main exposed.
! Do not drill a hole into the engine compart-
ment to connect the yellow cable of the dis-
play unit to the vehicle battery. Engine
vibration may eventually cause the insulation
to fail at the point where the wire passes from
the passenger compartment into the engine
compartment. Take extra care in securing the
wire at this point.
! It is extremely dangerous to allow the display
lead to become wound around the steering
column or gearshift. Be sure to install the dis-
play in such a way that it will not obstruct driv-
ing.
! Make sure that wires will not interfere with
moving parts of the vehicle, such as the gear-
shift, parking brake or seat sliding mechan-
ism.
! Do not shorten any cables. If you do, the pro-
tection circuit may fail to work properly.
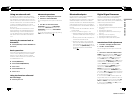
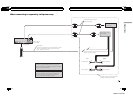
Notes
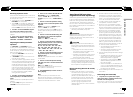
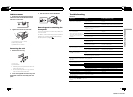
! This unit cannot be installed in a vehicle with-
out ACC (accessory) position on the ignition
switch.
O
N
S
T
A
R
T
O
F
F
ACC position No ACC position
! Use this unit with a 12-volt battery and nega-
tive grounding only. Failure to do so may result
in a fire or malfunction.
! To prevent a short-circuit, overheating or mal-
function, be sure to follow the directions
below.
— Disconnect the negative terminal of the
battery before installation.
— Secure the wiring with cable clamps or ad-
hesive tape. Wrap adhesive tape around
wiring that comes into contact with metal
parts to protect the wiring.
— Place all cables away from moving parts,
such as the gear shift and seat rails.
— Place all cables away from hot places,
such as near the heater outlet.
En
43
Section
04
Connections
Connections
<QRB3172-A/N>22