


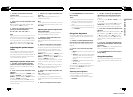
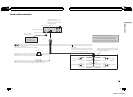
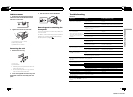
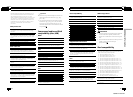


DIN Rear-mount
1 Determine the appropriate position
where the holes on the bracket and the
side of the unit match.
2 Tighten two screws on each side.
1
2
3
1 Truss screw (5mm × 8mm)
2 Mounting bracket
3 Dashboard or console
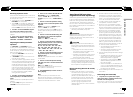
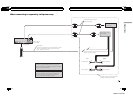
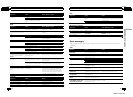
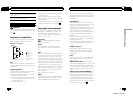
Removing the unit
1 Remove the trim ring.
1 Trim ring
2 Notched tab
! Releasing the front panel allows easier ac-
cess to the trim ring.
! When reattaching the trim ring, point the
side with the notched tab down.
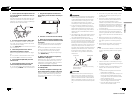
2 Insert the supplied extraction keys into
both sides of the unit until they click into
place.
3 Pull the unit out of the dashboard.
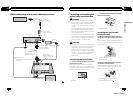
Removing and re-attaching the
front panel
You can remove the front panel to protect your
unit from theft.
For details, refer to Removing the front panel to
protect your unit from theft and Re-attaching
the front panel on page 9.
En
54
Section
05
Installation
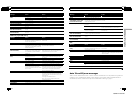
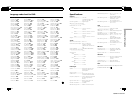
Troubleshooting
Common
Symptom Cause Action (Reference page)
The power will not turn on.
The unit will notoperate.
Leads and connectors are incor-
rectly connected.
Confirm once more that allconnections are
correct.
The fuse is blown. Rectify the cause and thenreplace the fuse.
Be sure to install a fuse withthe same rating.
Noise and/or other factors are caus-
ing the built-in microprocessor to
operate incorrectly.
Turn the unit off andthen on. (Page 9)
Operation with the remote con-
trol is not possible.
The unit does notoperate cor-
rectly even when theappropriate
remote control buttons are
pressed.
The remote control operation mode
is incorrect.
Switch to the correct remote control mode.
(Page 8)
Battery power is low. Load a new battery.
Some operations are prohibited
with certain discs.
Tr y operating with another disc.
Playback is not possible. The disc is dirty. Clean the disc. (Page 60)
The type of discloaded cannot be
played on this unit.
Check the disc type.
The disc loaded isnot compatible
with this video system.
Change the disc to onethat is compatible
with your video system.
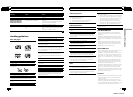
There is no sound.
The volume level will notrise.
Cables are not connected correctly. Connect the cables correctly.
The unit is performing still, slowmo-
tion or frame-by-frame playback.
There is no sound duringstill, slow motion or
frame-by-frame playback.
The
icon is displayed, and op-
eration is not possible.
The operation is prohibited forthe
disc.
This operation is notpossible.
The operation is notcompatible
with the configuration of the disc.
This operation is notpossible.
The image displayed stops
(pauses) and the unit cannotbe
operated.
The data could nolonger be read
during playback.
Stop playback once, andstart playback again.
There is no sound.
The volume level islow.
The volume level islow. Adjust the volume level.
The attenuator is on. Turn the attenuator off.
The sound and video skip. The unit is not firmly secured. Firmly securethe unit.
File size and transmission rate are
above recommended rates.
Create a DivX filethat is within the recom-
mended size and transmission rate.
The aspect ratio isincorrect and
the image is stretched.
The aspect ratio setting isincorrect
for the display.
Select the appropriate setting for your display.
(Page 26)
The motor sounds when the
ignition switch is turned ON(or
is turned to ACC).
The unit is confirming whetheror
not a disc isloaded.
This is a normaloperation.
No xxxx appears when adis-
play is changed (No Title, for ex-
ample).
There is no embedded textinforma-
tion.
Switch the display or playanother track/file.
En
55
Appendix
Additional Information
Additional Information
<QRB3172-A/N>28