


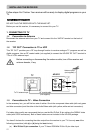


STEP C: SETTING UP YOUR RECEIVER
Note: If your service provider or antenna installer has already installed your TV system to receive
terrestrial TV programs, do not change any connections of those devices or installation settings
unless it is absolutely necessary.
If your receiver has not been configured by your service provider or system installer, it will not be
set up for any specific channel or frequency when powered on for the first time. In this case you
should follow the steps below to set up your receiver.
1.
2.
3.
4.
5.
x
x
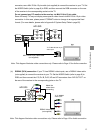
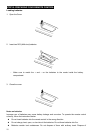
Switch on the TV.
Using your TV’s remote control, select the appropriate external Audio/Video input on your TV
according to the connection you have made in Step A.
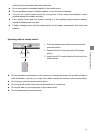
Make sure the receiver is already in power-on mode. If it is in standby mode (i.e. front panel shows
“----“), switch on the receiver by pressing the “STANDBY/ON” button on the front panel of the
receiver or on the remote control.
A message “Database is Empty” should appear after a while. If you can see the message, go to
Step 5 directly;
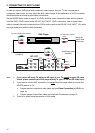
However, if you cannot see the message on the screen even after a long time, please change the
video format by pressing V.FORMAT button on remote control or on the front panel (the default
video format of HD-S25 receiver is “PAL” if the
MODE-Switch is set to YP
B
P
R
and the default video
format is “576p” if the
MODE-Switch is set to RGB). Press V.FORMAT button until you see the
message “Database is Empty”.
Note: When you press V.FORMAT button, the four-digit LED on the receiver’s front panel will
display among “PAL” (for MODE-Switch being set to YP
B
P
R
only), “AUTO”, “1080i”, “720p” and
“576p”. After you press V.FORMAT button, please make sure the front panel LED display has
changed before you press the button again.
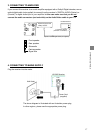
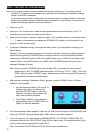
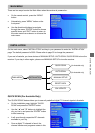
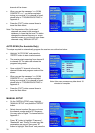
After you see a message “Database is Empty” appears, press the “MENU” button. A “Region
Selection” menu appears.
Use the directional buttons “Ż” and “Ź” to
highlight your region of residence and
press the “ENTER” button to make your
selection. The region setup process may
take a few minutes to complete.
If the “Region Selection” menu does not
appear, please refer to “RESET DATA” on
page 27 to reset the database.
6.
7.
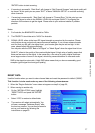
You will see the Main Menu (page 25). Press the “ź” button twice to highlight “INSTALLATION” and
then press “ENTER”. When prompted, enter “0000” which is the default password.
To tune the receiver, you have choices of MANUAL SETUP / AUTO SCAN / QUICK SCAN. We
recommend that you use “QUICK SCAN” (page 25) for a faster setup. For more information on the
various tuning options, please refer to pages 25~27.
Note: The choices of AUTO SCAN and QUICK SCAN are for Australia only.
20