


52
206-4261
(Continued from previous page)
3. Set Installer Menu item 117 FACT DEFAULT to 1 and press OK on the Installer Remote.
This clears all Installer Menu custom settings, the channel lineup, etc. and restores the factory
default settings. The value will change back to 0 after the commercial controller (PTC) has been
restored to factory default condition. This step ensures that the TV Channel Memory will be the
active channel lineup.
4. Set Installer Menu item 003 BAND/AFC, as appropriate.
• Broadcast: Set to 0. • HRC: Set to 2.
• CATV: Set to 1 (default). • IRC: Set to 3.
5. Set Installer Menu item 027 HOSPITAL MODE, as appropriate, to select the speaker
conguration. Also, set any other Installer Menu items that affect your TV programming network
to the required conguration. For example, enable/disable Aux inputs, set a Start Channel, etc.
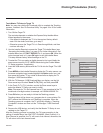
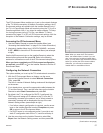
You may also congure Pro:Centric settings in the IP Environment Menu (accessible from the
Installer Menu). See “IP Environment Setup” on pages 57 to 60 for further information. However,
note that you cannot return directly to the Installer Menu from the IP Environment Menu; thus,
you may wish to set all Installer Menu items as needed before you access the IP Environment
Menu. Otherwise, you will need to reaccess the Installer Menu to set additional items.
6. After you have adjusted all Installer Menu item settings as required, press OK once on the
Installer Remote to save your changes; then, press OK again to exit the menu.
Set Up TV Features
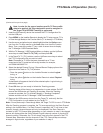
On-screen setup menus control the features of the TV. Press MENU on the Installer Remote to
access the TV setup menus, and then set Channel, Picture, Audio, Time, etc. options to the desired
configurations. In particular, if you intend to use the TV Zoning feature, make sure to assign the
appropriate TV Zone # in this TV as described in Reference section, “Using the TV Zoning Feature.”
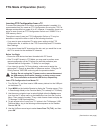
Run Auto Tuning (Channel Search)
Note: Decryption of Pro:Idiom encrypted channels will not be enabled unless you use the FTG File
Manager to set the channel attributes.
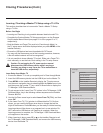
1. Search for all available analog and digital channels: Use the Installer Remote to go to the
Channel Menu, select the Auto Tuning option, and follow the on-screen instructions.
2. Use the Channel Edit option in the Channel Menu to edit the channel lineup, as necessary.
Add/delete channels per your system requirements.
Once you have completed these procedures, return to “Learning FTG Conguration from a TV”
above to complete the Learn sequence.
FTG Mode of Operation (Cont.)