


ķ
15
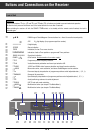
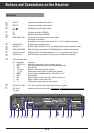
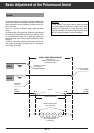
Basic Adjustment of the Polarmount Aerial
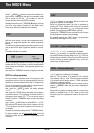
Installation Menu
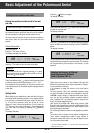
With the unit switched off, press and hold down the
¢
V/H
button and switch the unit on. The display indicates
"
INSTALL
".
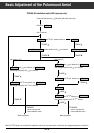
The preceding diagram shows an overview of the installation
menu. After approx. 3 seconds, the display indication chan-
ges to "
INPUT A
". With the
¢
<
/
>
buttons, you can
switch to "
INPUT B
". Select the desired aerial input, then
press the
¢
MODE
ɶɶ
button.
You pass to the next menu item where the frequency of the
local oscillator 1 (lower LNC frequency range) will be asked.
The display indicates "
LOC OSC1
". Pressing one of the
¢
<
/
>
buttons switches to the frequency indication. Select
the desired value with the
¢
<
/
>
buttons (hold down the
corresponding button to let scroll the values at high speed).
With system 1 or 2, pressing the
¢
MODE
ɶɶ
button swit-
ches to the 2nd oscillator frequency (upper LNC frequency
range). The display indicates "
LOC OSC2
". Enter the fre-
quency as described above.
Next, you can...
– if necessary, proceed by selecting INPUT B with the
¢
MODE
ɶɶ
button.
– store in memory the settings made by pressing the
¢
MEMORY button (this will close the installation menu).
– abort the installation menu by pressing the
¢
P/F button.
The old settings are restored and the installation menu is
closed. Aborting the menu with the
¢
P/F button is possi-
ble from any menu item.
With system 3, the oscillator frequencies for both inputs
must be entered. The inputs A and B a permanently allocated:
Input A: Frequency band 11 GHz.
Polarizations V1, H1.
Input B: Frequency band 12 GHz.
Polarizations V2, H2.
In this case, it is not
possible to use the
¢
V/H button to
directly switch during normal operation between the inputs A
and B, as explained in chapter "
¢
V/H – Selecting
Vertical/Horizontal Polarization and Input A/B". It is possible
to freely select between the polarizations V1, H1 (input A) and
V2, H2 (input B). Switching between the inputs then is per-
formed automatically.
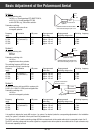
Adapting the Polarizer
If you should have selected a system with magnetic or motor-
driven polarizer, this must also be preadjusted, as there are
many different types available.
How to proceed:
At first, the aerial must be positioned at the satellite. We
recommend the powerful Astra satellite. This will be ex-
plained in the following example.
Select the programme position number 1 (Astra satellite, 19°
East, ARD) on the receiver. This programme position is pre-
programmed with horizontal polarization H1. The default
impressed current for the polarizer is to be optimized by per-
forming the following steps:
Press the
¢
ʐ button to switch the receiver into the manual
aerial positioning mode. Press the
¢
<
button to run to limit
1, then press the
¢
>
button to search the Astra 19° East
satellite. If the picture of ARD appears on the picture
screen, the correct satellite has been found.
If you should not be able to find this programme, change the
polarity of the connections of the magnetic polarizer on the
10-pole connector (MAGN:/GND) and repeat the above steps.
Press the
¢
ʐ button once again to display the signal level.
Adjust the maximum level by means of the
¢
<
or
¢
>
button. Press the
¢
V/H button and then the
¢
MODE
ɶɶ
button.
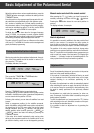
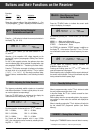
The display indicates, for example:
The polarizer current can be adjusted by pressing the
¢
<
/
>
button. The correct adjustment is situated between
the black and white spikes. To avoid multiple polarization
rotations, the smallest required value should be adjusted.
Press the
¢
MODE
ɶɶ
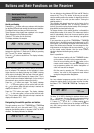
button once again.
The display indicates:
Store the setting with the
¢
Memory button. All programme
positions preprogrammed with H1 now will successively be
set to this optimum value.
Repeat the same steps for stations with vertical polarization
V1.
For this, select programme position 3 (RTL in Germany).
Press the
¢
V/H and then the
¢
MODE
ɶɶ
button.
The display indicates, for example:
TIMER
opü+
I99 SKEWXX23
STEREO
SIGNAL IIIIIIIIIIIII
TIMER
opü+
I99 SKEWXALL
STEREO
SIGNAL IIIIIIIIIIIII
TIMER
opü+
I99 SKEWXX72
STEREO
SIGNAL IIIIIIIIIIIII