


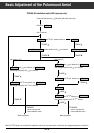


Buttons and their Functions on the Receiver
ķ
18
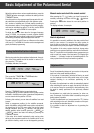
Examples:
IF 1: Entry: Indication:
1200 MHz 01200 11200 Mz
950 MHz 00950 10950 Mz
Please also observe setting of the video deviation –1, –2 or
–3 (see paragraphe "
¢
Video – Adjusting the Video Deviation").
¢¢
V/H – Selecting Vertical/Horizontal
Polarization and Input A/B
Press the
¢
V/H button to indicate the current polarization in
the display, e.g., (H1 18 V)
With the
¢
<
/
>
buttons, you can select between V1, H1,
V2, and H2.
Allocation of the respective LNC voltage depends on the
selected LNC system (see paragraphe "Setting Zero Position
and Limits").
For LNC´s with magnetic polarizer, the optimum skew value
must be adjusted after having selected the polarization (see
also paragraphe "SKEW ALL – Transferring the Skew Value").
Press the
¢
V/H button once again to indicate on the display
the input which is to be selected with the
¢
<
/
>
buttons
("
INPUT A
" or "
INPUT B
"). See also the sections "Adap-
ting the Polarizer, Installation Menu", and "Selecting the Aerial
Input".
¢VIDEO – Adjusting the Video Deviation
The frequency-modulated satellite signals are transmitted
with different deviations. To obtain a good picture, the recei-
ver must be adjusted correspondingly.
Press the
¢
VIDEO button to indicate on the display the
video deviation and video polarity, e.g., (DEV. 3).
The video deviation is selected with the
¢
<
/
>
buttons:
DEV. 1 = 25 MHz, DEV. –1 = 25 MHz,
DEV. 2 = 22.5 MHz, DEV. –2 = 22.5 MHz,
DEV. 3 = 16 MHz, DEV. –3 = 16 MHz.
For C-band and S-band reception with 4- resp. 2.5GHz
LNC´s, the video signal must be inverted by selecting the set-
ting DEV. –1 … DEV. –3.
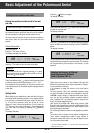
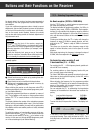
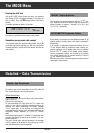
TIMER
opü+
I99 DEV
.
X3XX
STEREO
SIGNAL IIIIIIIIIIIII
TIMER
opü+
I99 H1X18VX-
STEREO
SIGNAL IIIIIIIIIIIII
¢¢
AUDIO – Mono/Stereo and Sound
Carrier Switching
Press the
¢
AUDIO button to indicate the current audio
mode in the display, for example:
By repeatedly pressing the
¢
AUDIO button, you can select
between:
MONO < > = Main carrier, Mono wide,
MONO > < = Subcarrier, Mono Panda Wegener,
STEREO = Panda carrier*, Stereo.
On STEREO, the indication "STEREO" appears in addition on
the display
´`
of the receiver. Press the
¢
<
or
¢
>
but-
ton to indicate the actual value of the set frequency, for exam-
ple:
You can adjust the frequency between 5.00MHz and
9.99MHz in steps of 10 k Hz.
Pressing and holding down the
¢
<
or
¢
>
button will
scan the frequencies at high speed.
Direct frequency entry is possible with the numeric buttons of
the remote control handset. Tuning will be effected only after
having entered the third frequency digit.
¢
<
/
>
– Down/Up Setting Buttons
When in programme mode, use the
¢
<
/
>
buttons to select
the next programme position down or up.
In the other modes, the
¢
<
/
>
buttons are used for chan-
ging the entered data.
When holding down the corresponding button, the program-
me positions or data values are selected and displayed at
high speed.
When in standby, pressing the
¢
<
/
>
buttons will switch to
the last selected SAT programme position (Last Station
Memory).
¢MEMORY – Storing Data in Memory
Pressing the
¢
MEMORY button stores all data in memory.
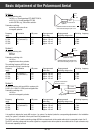
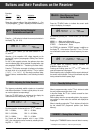
TIMER
opü+
I99 X7
.
02MH
z
STEREO
SIGNAL IIIIIIIIIIIII
TIMER
opü+
I99 MONOX
<
X
>
STEREO
SIGNAL IIIIIIIIIIIII
*Panda/Wegener Communications Inc.. Award for highest tone quality.